Operations Guide
Purpose
This guide provides instructions for operating and maintaining the Kylo solution. The information is used by the Operations and Support Team in the deployment, installation, updating, monitoring and support of Kylo.
Scope
This guide is not a step-by-step process for the Operations Team, but a set of examples that we have assembled from our previous experiences.
Audience
This guide assumes its user to be knowledgeable in IT terms and skills. As an operations and maintenance (O&M) runbook, it describes the information necessary to effectively manage:
- Production processing
- Ongoing maintenance
- Performance monitoring
This document specifically serves to guide those who will be maintaining, supporting, and using the Kylo solution in day-to-day operational basis.
Abbreviations
| Abbreviations/Key term | Definition |
| O&M | Operations and Maintenance |
| CLI | Command Line Interface |
| ES | ElasticSearch |
Introduction
Kylo is a software application that provides scheduling, monitoring, and control for data processing jobs. Kylo includes its own web-based interface intended for an Operations user to visualize status of processing and assist with troubleshooting problems.
Please note, this Operations Guide is provided in its entirety, despite the fact that not all features may be utilized within a particular solution.
Common Definitions
The following terms are used in this document or are relevant to understanding the nature of Kylo processing.
| Term | Definition |
| Job | A Job consists of a sequence of processing tasks called steps. A Job has both status and state that indicate its outcome. |
| Feed | A feed is a pipeline, jobs are run for feeds. The “health” status of a feed (regardless of its running state) can be visualized on the Kylo Dashboard page. |
| Check Data Job | An optional job type employed for independent data quality checks against customer data with results contributing to a “Data Confidence” metric visible on the Dashboard page. |
| Step | A unit of processing in a job sequence. A job consists of one or more steps. Each step also has both status and state, similar to that of a job. Steps may capture metadata, stored in Postgres and viewable in the application. |
| Job Instance Id | The Job Instance and its corresponding Job Instance Id refer to a logical Job run (i.e. A Job with a set of Job Parameters). A Job Instance can have multiple Job Executions, but only one successful Job Execution. |
| Job Execution Id | The Job Execution and corresponding Job Execution Id refer to a single attempt to run a Job Instance. A Job Instance can have multiple Job Executions if some fail and are restarted. |
User Interface
Kylo has a web-based user interface designed for an Operations user to monitor and managing data processing. The default URL is http://<hostname>:8400/, however the port may be configured via the application.properties.
The following sections describe characteristics of the user interface.
Dashboard Page
The Dashboard tab performs the role of an Operations Dashboard. Content in the page automatically refreshes showing real-time health and statistics about data feeds and job status.
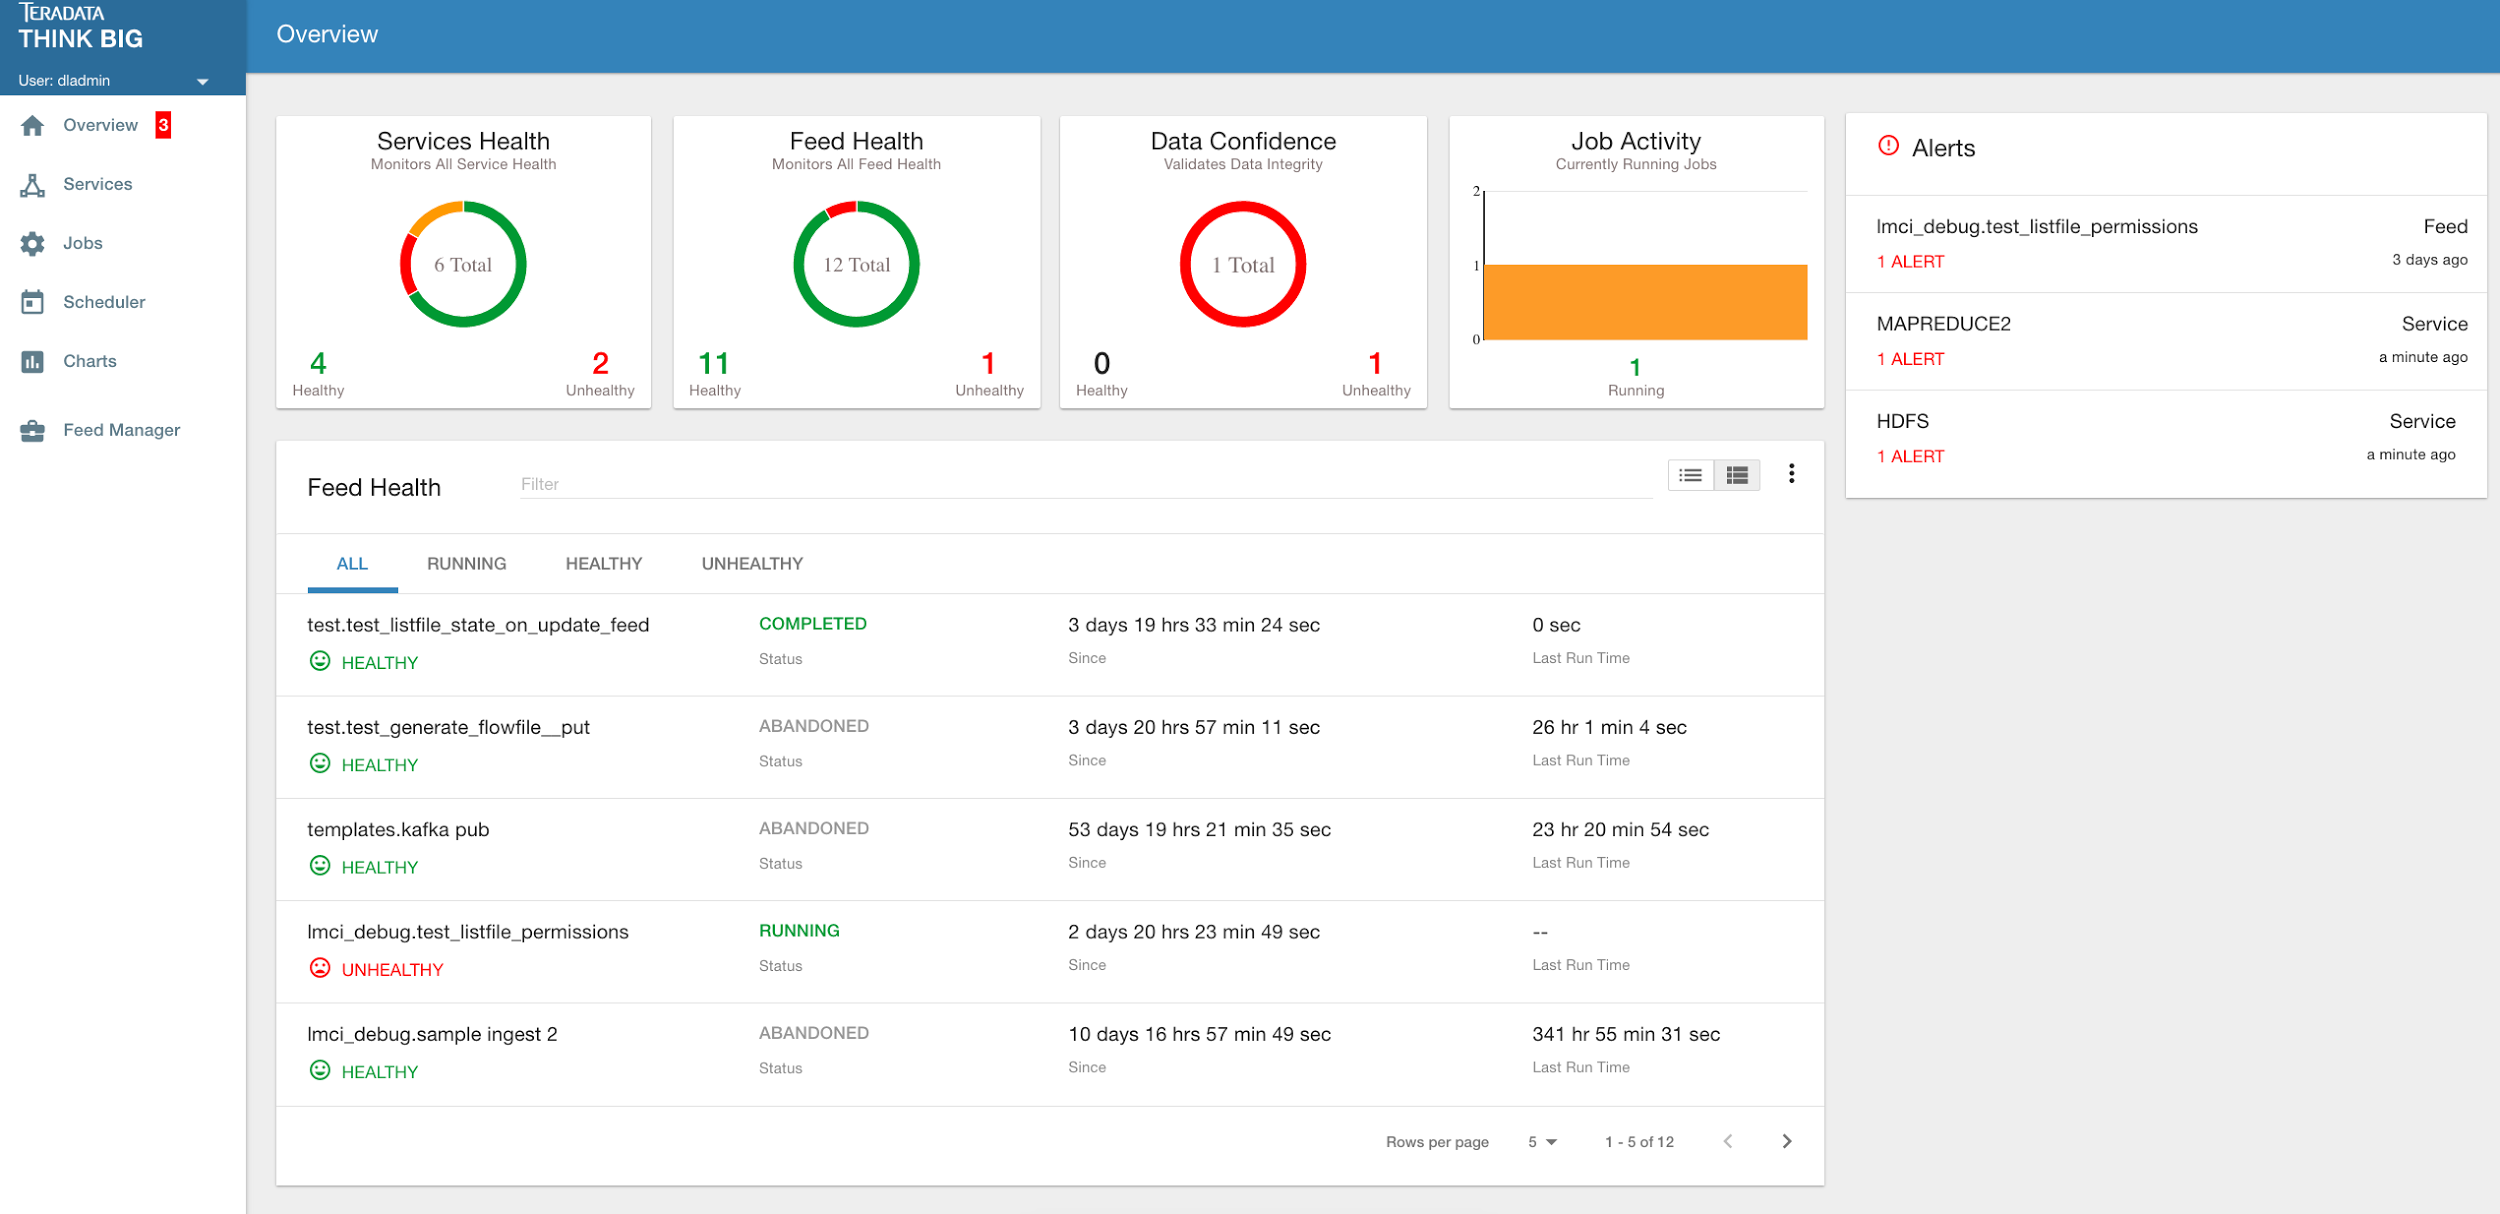
Kylo Dashboard Page
Key Performance Indicators
The Dashboard page has multiple indicators that help you quickly assess the health of the system:
 |
Provides a health status of external dependencies such as MySQL or Postgres, Hadoop services. |
 |
Provides a summary health status of all data feeds. Details of these feeds are shown in a table, Feed Health, also on the Dashboard Page |
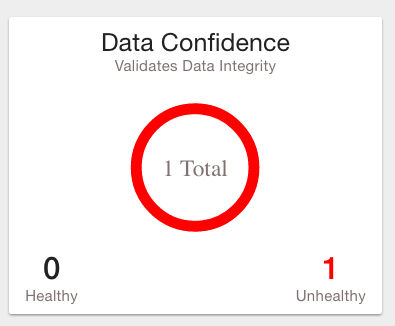 |
Optional. Displays a confidence metric updated by any Data Quality Check jobs. |
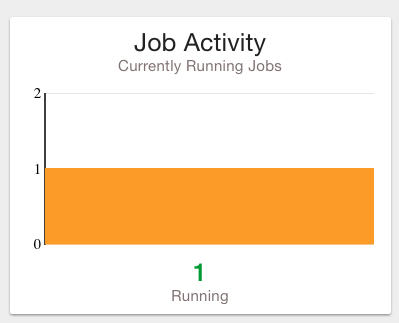 |
Displays all running jobs. |
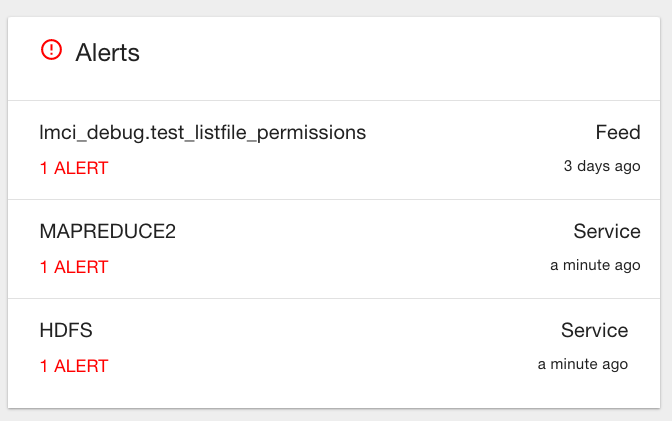 |
Displays alerts for services and feeds. Click on them for more information. |
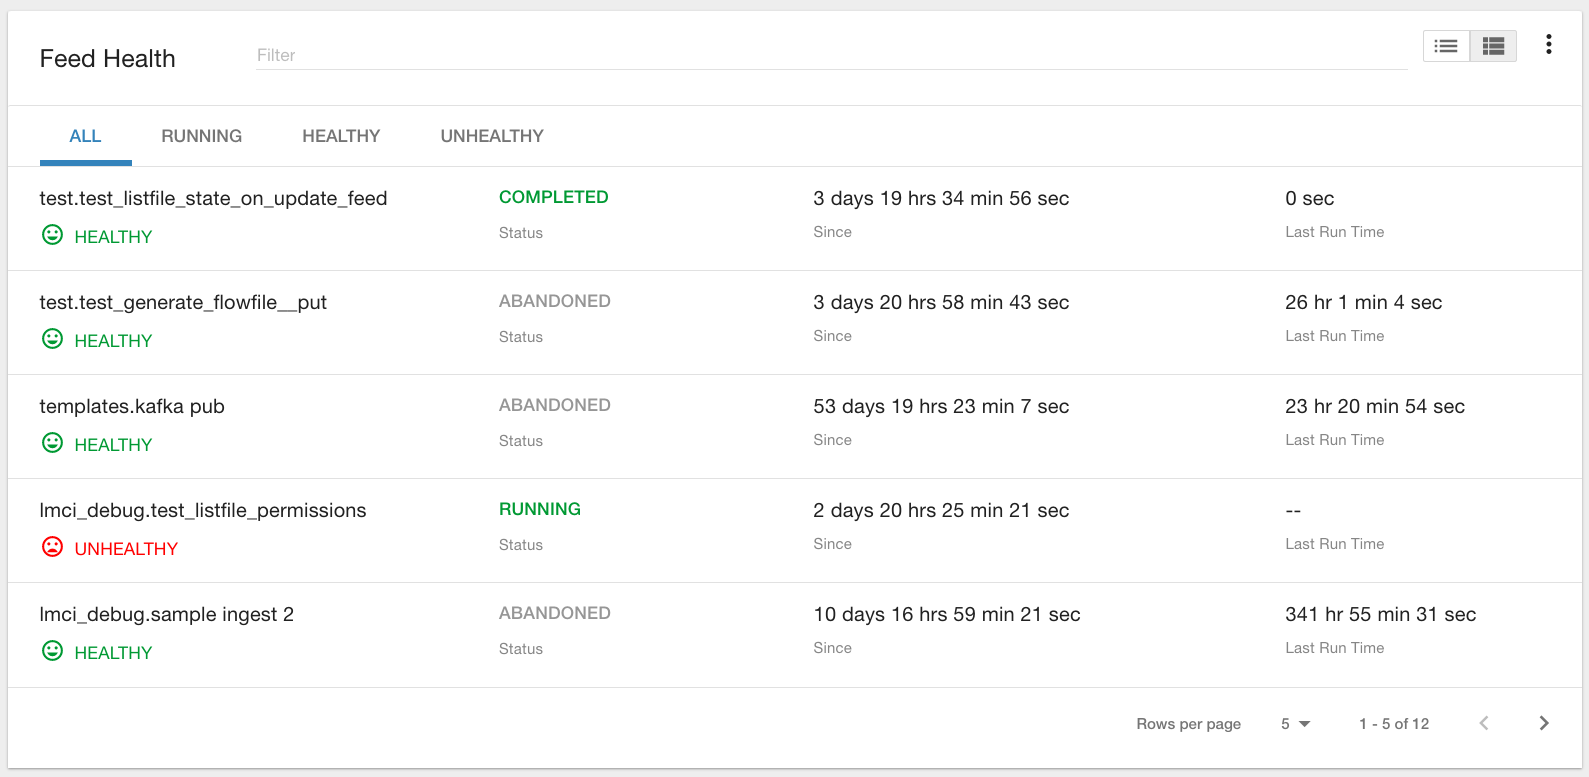
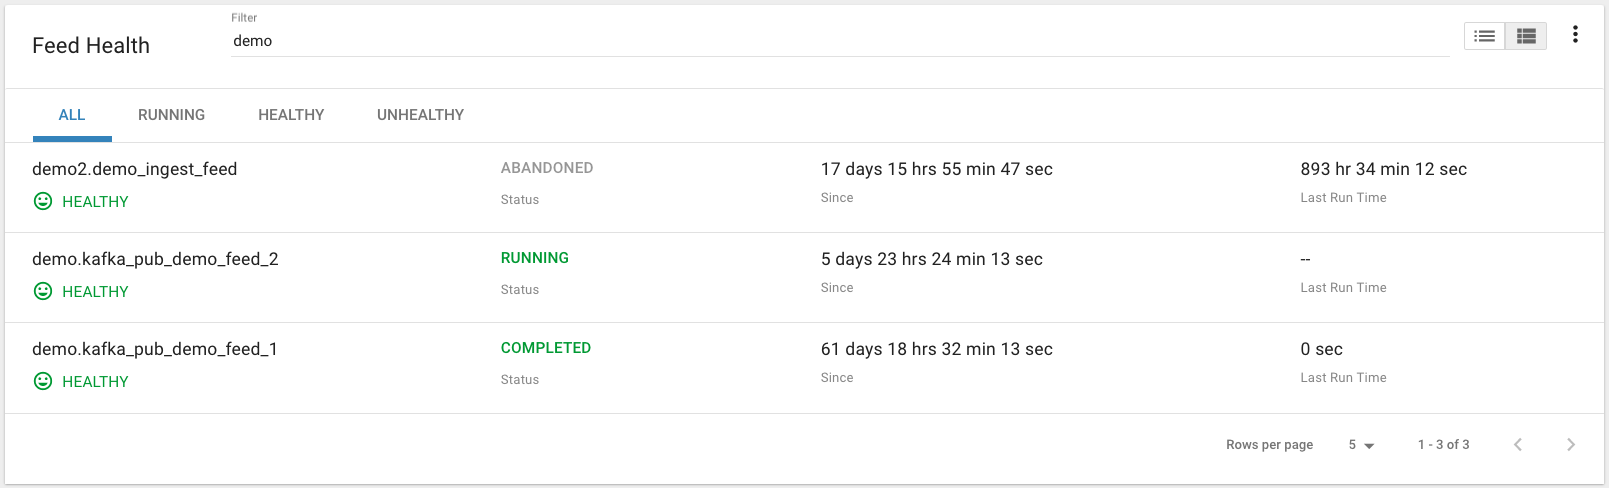
Feed Health
The Feed Health Table provides the state and status of each data feed managed by Kylo. The state is either HEALTHY or UNHEALTHY. The status is the status of the most recent job of the feed. You can drill into a specific feed and see its *history* by clicking on the name of the feed in the table.
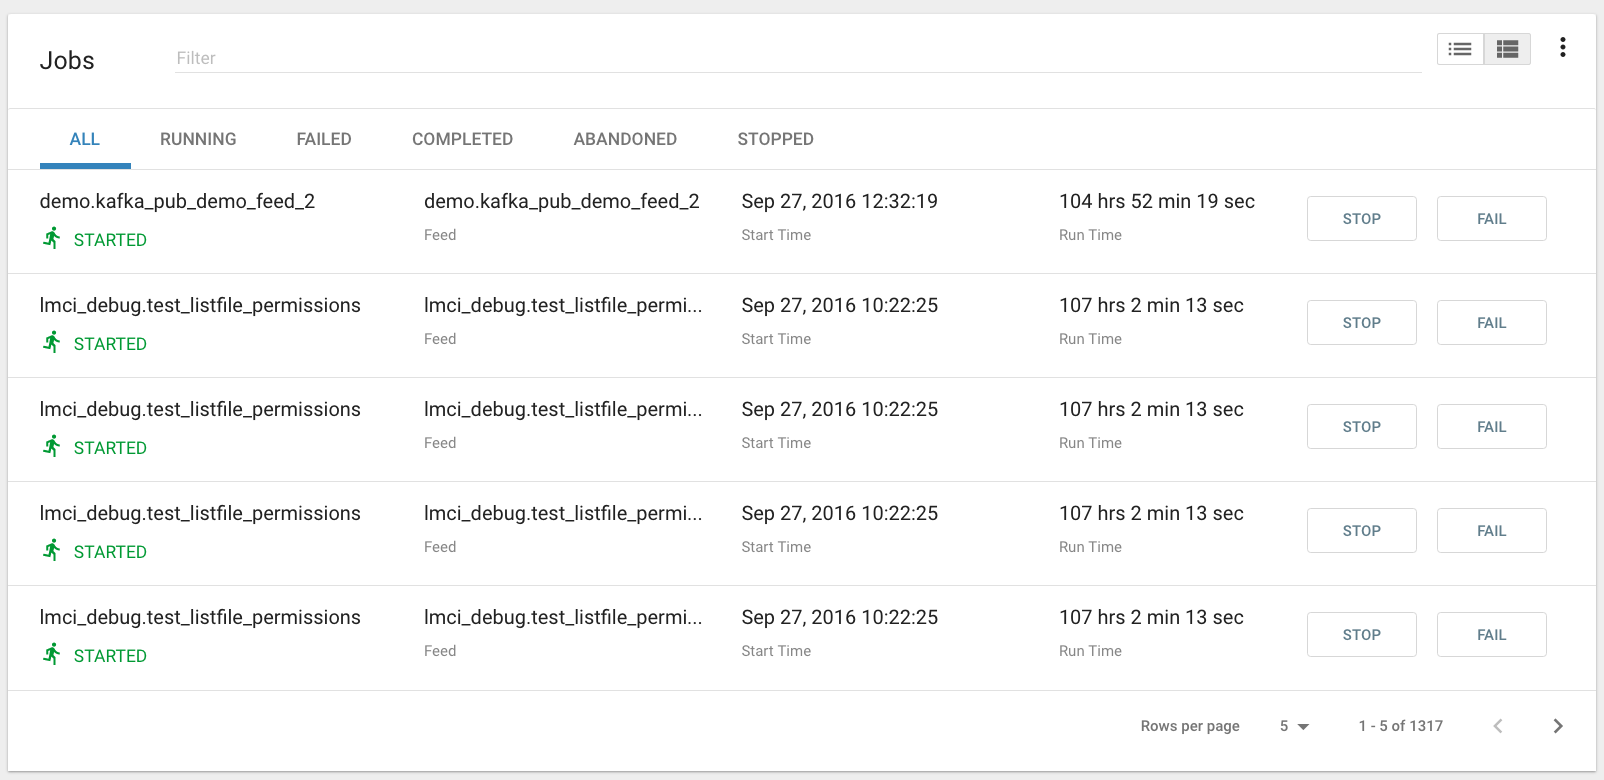
Active Jobs
The Active Jobs table shows currently running jobs as well as any failed jobs that require user attention. The table displays all jobs. A user may drill-in to view *Job Details* by clicking on the corresponding Job Name cell. Jobs can be controlled via action buttons. Refer to the *Controlling Jobs* section to see the different actions that can be performed for a Job.
Understanding Job Status
Jobs have two properties that indicate their status and state, Job Status and Exit Code respectively.
Job Status
The Job Status is the final outcome of a Job.
- COMPLETED – The Job finished.
- FAILED – The Job failed to finish.
- STARTED – The Job is currently running.
- ABANDONED – The Job was abandoned.
Job Exit Codes
The Exit Code is the state of the Job.
- COMPLETED – The Job Finished Processing
- EXECUTING - The Job is currently in a processing state
- FAILED – The Job finished with an error
- ABANDONED – The Job was manually abandoned
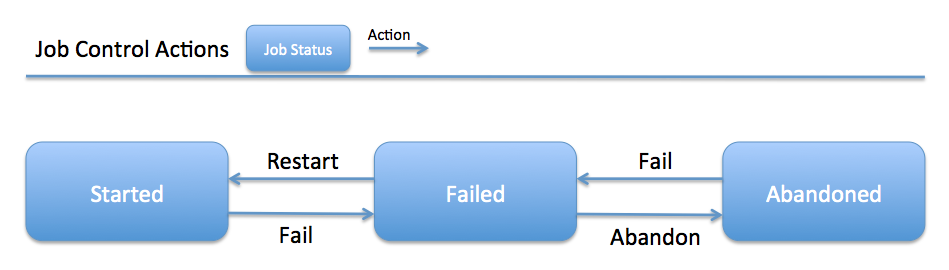
Controlling Jobs
The image below illustrates the different actions that can be performed based on its Job Status:
Feed History Page
Kylo stores history of each time a feed is executed. You can access this data by clicking on the specific feed name in the Feed Health table on the Dashboard page. Initially the Feeds table provides high-level data about the feed.
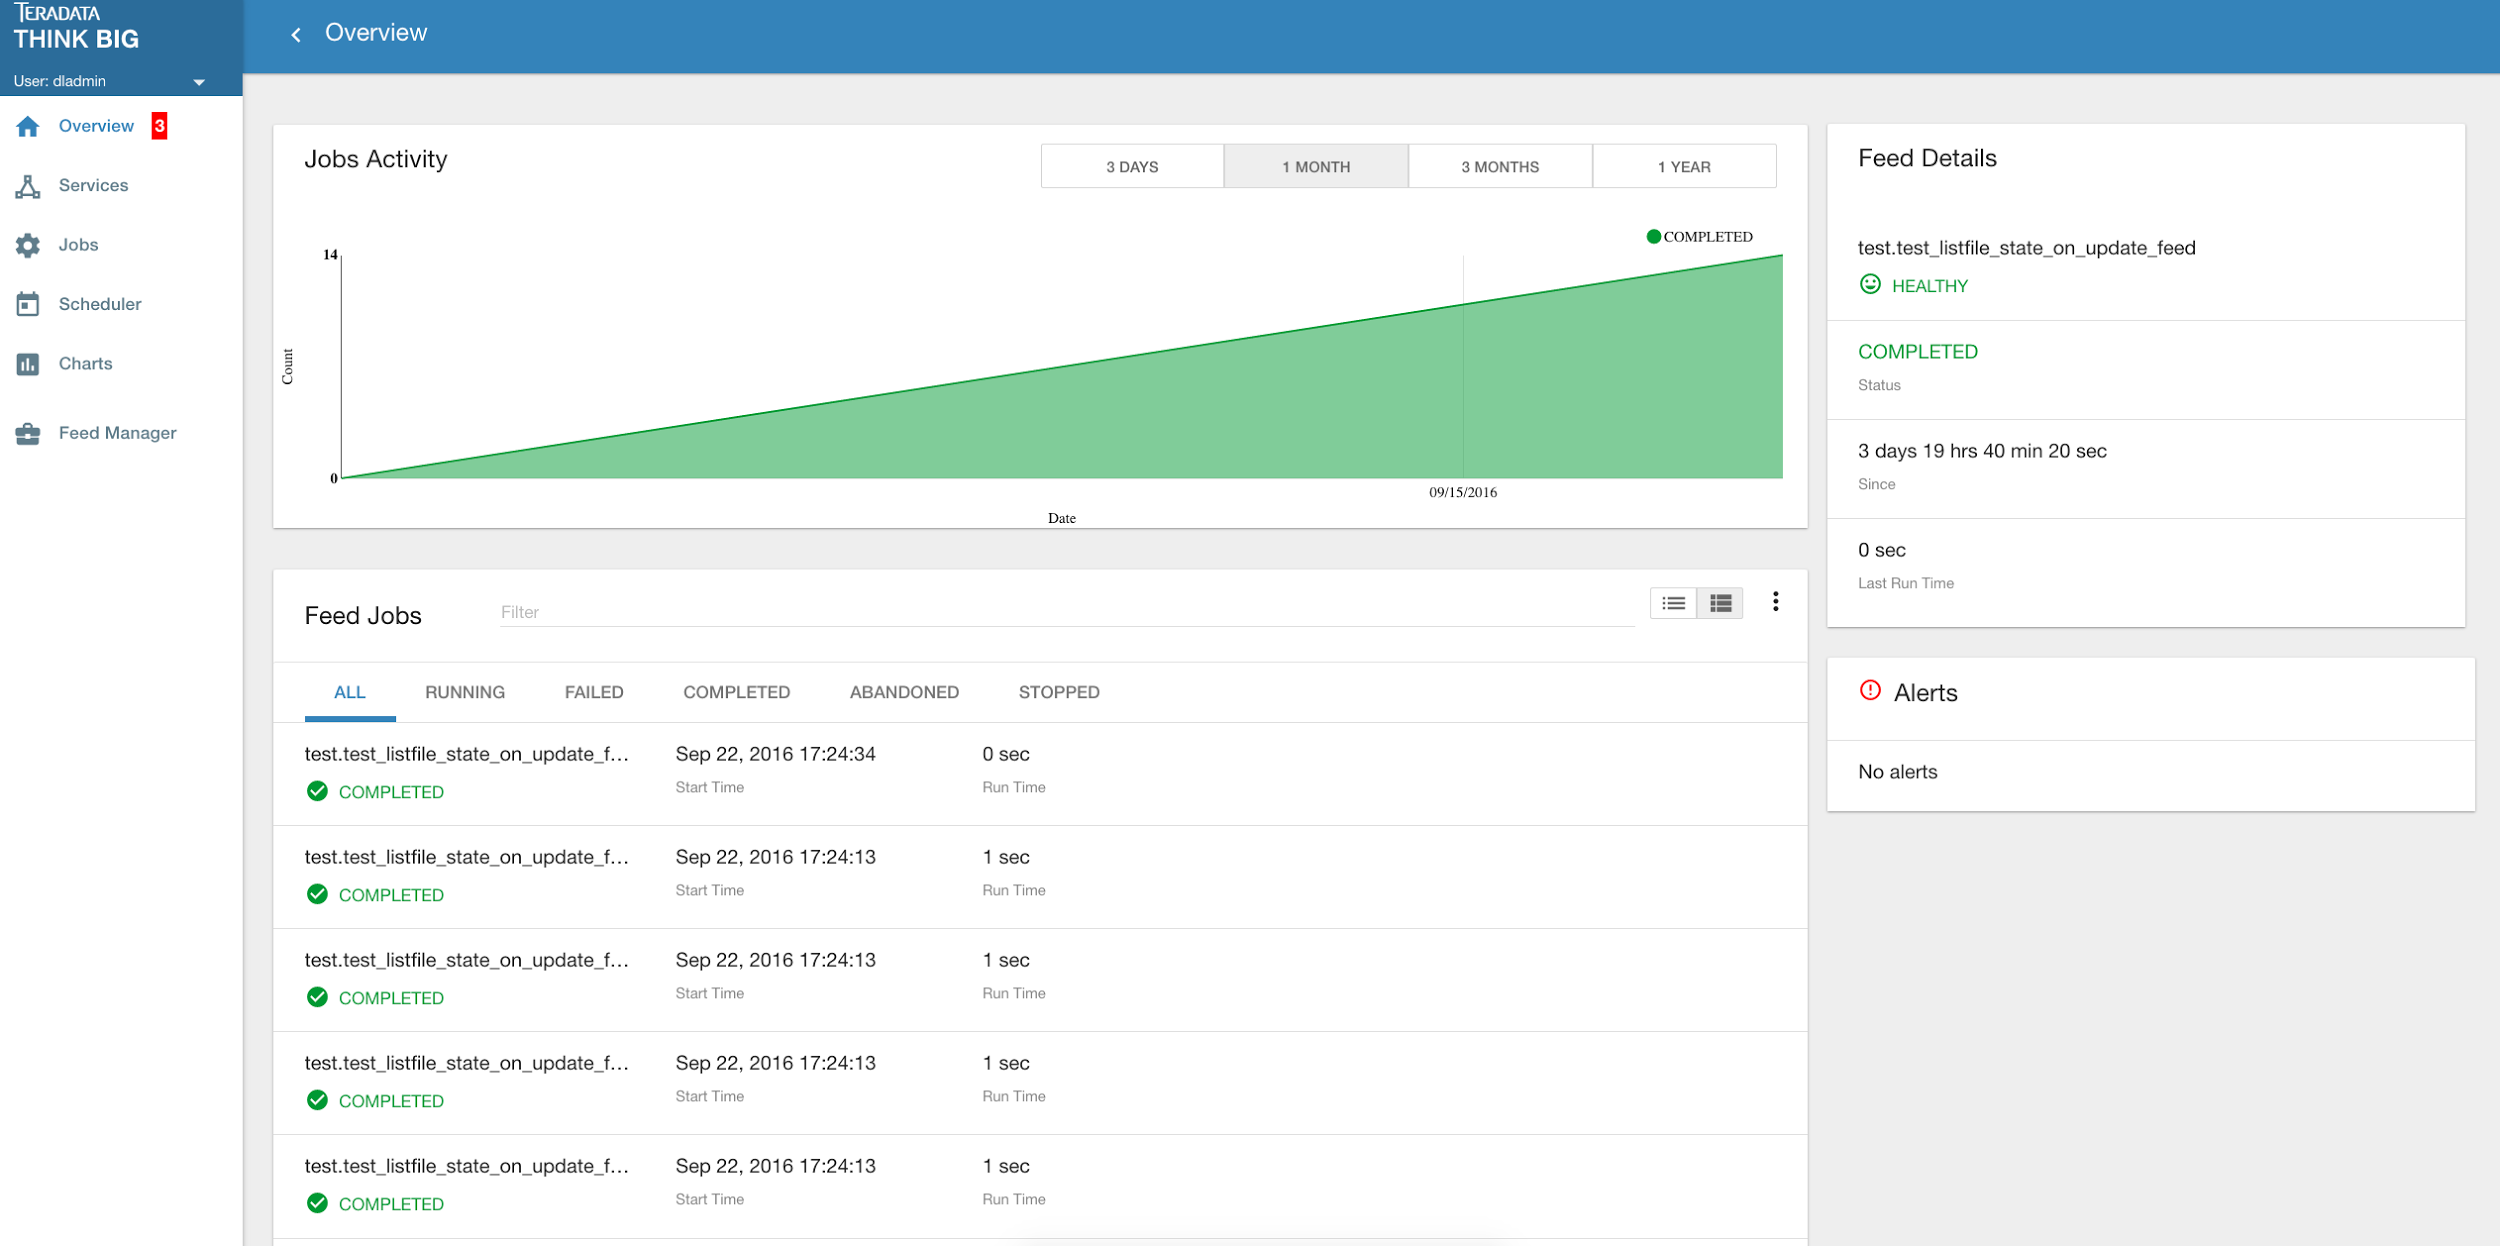
You can get more data by clicking on a job in the Feed Jobs table. This will go into the Job Details page for that job.
Job History Page
Job history can be accessed in the Jobs Tab.
The Job History page provides a searchable table displaying job information, seen below. You can click on the Job Name to view the *Job Details* for the selected Job.
Job Detail Drill-Down
Clicking on the Job Name from either the Jobs Tab or Feeds Tab accesses the Job Details. It shows all information about a job including any metadata captured during the Job run.
The detail page is best source for troubleshooting unexpected behavior of an individual job.
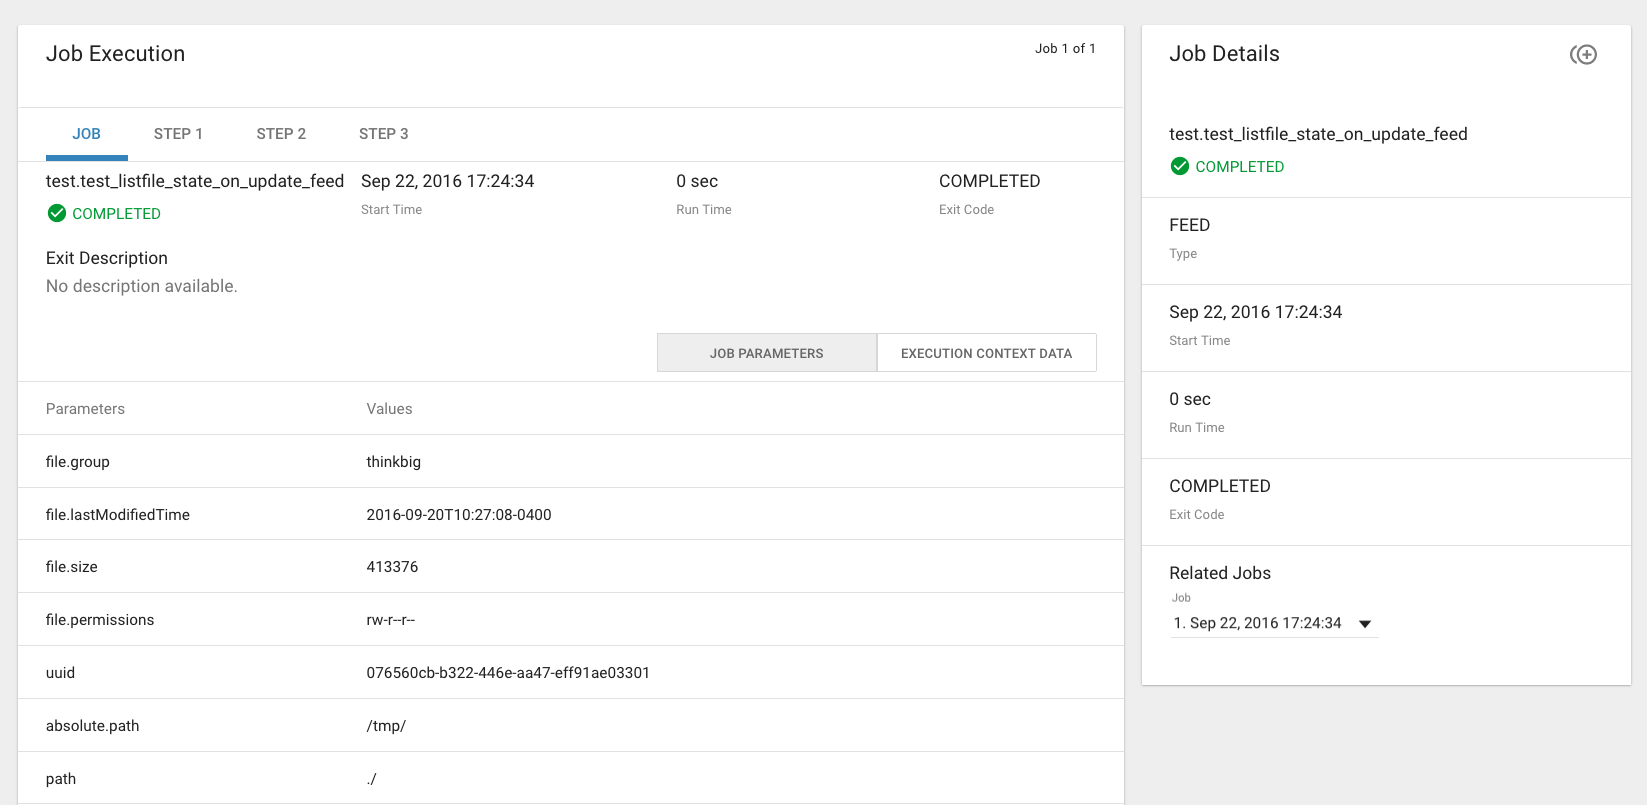
Job Status Info
Job Status information such as start and run time, along with any control actions, are displayed on the right.

Job Parameters
A Job has a set of parameters that are used as inputs into that job. The
top section of the Job Details page displays these
parameters. 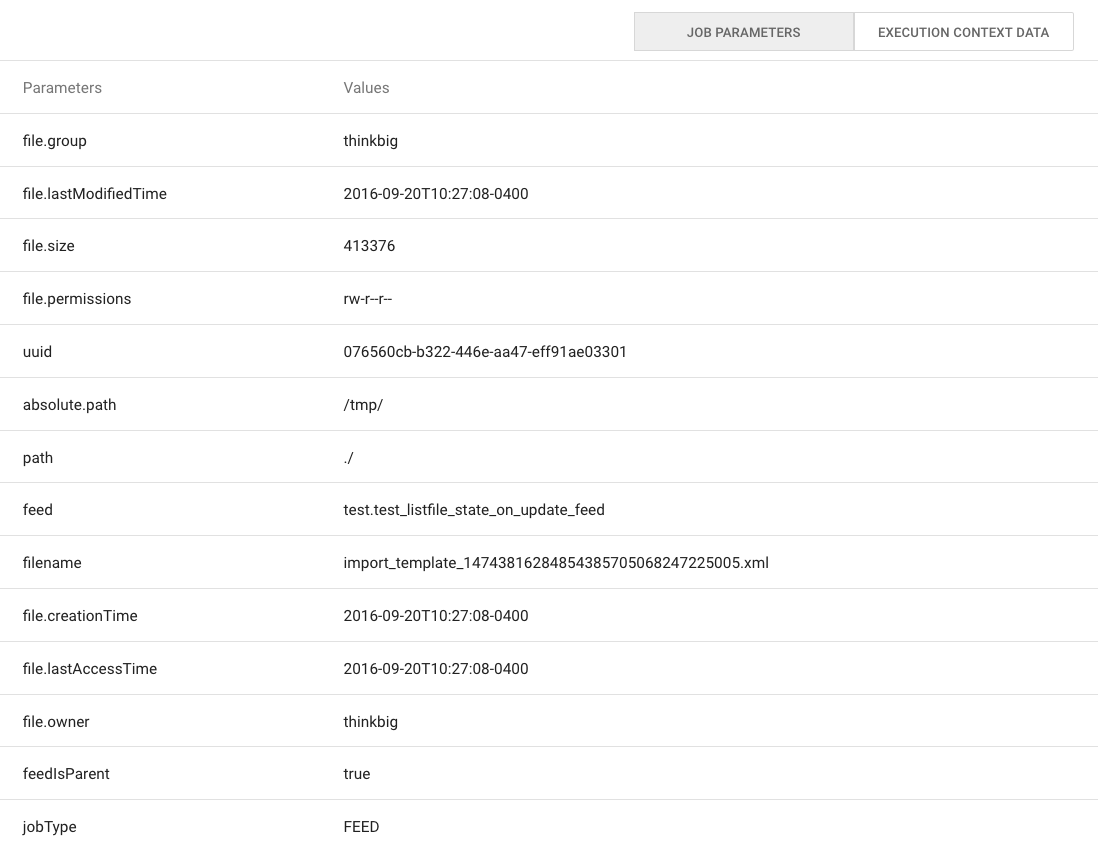
Job Context Data
As a Job runs operational metadata is captured and step status is visible in the Job page.
This metadata is stored in the Job Context section. Access this section by clicking on the Execution Context Data button next to the Job Parameters button in the previous figure.
Step Context Data
A job can have multiple steps, each of which capture and store metadata as it relates to that step.

Scheduler Page
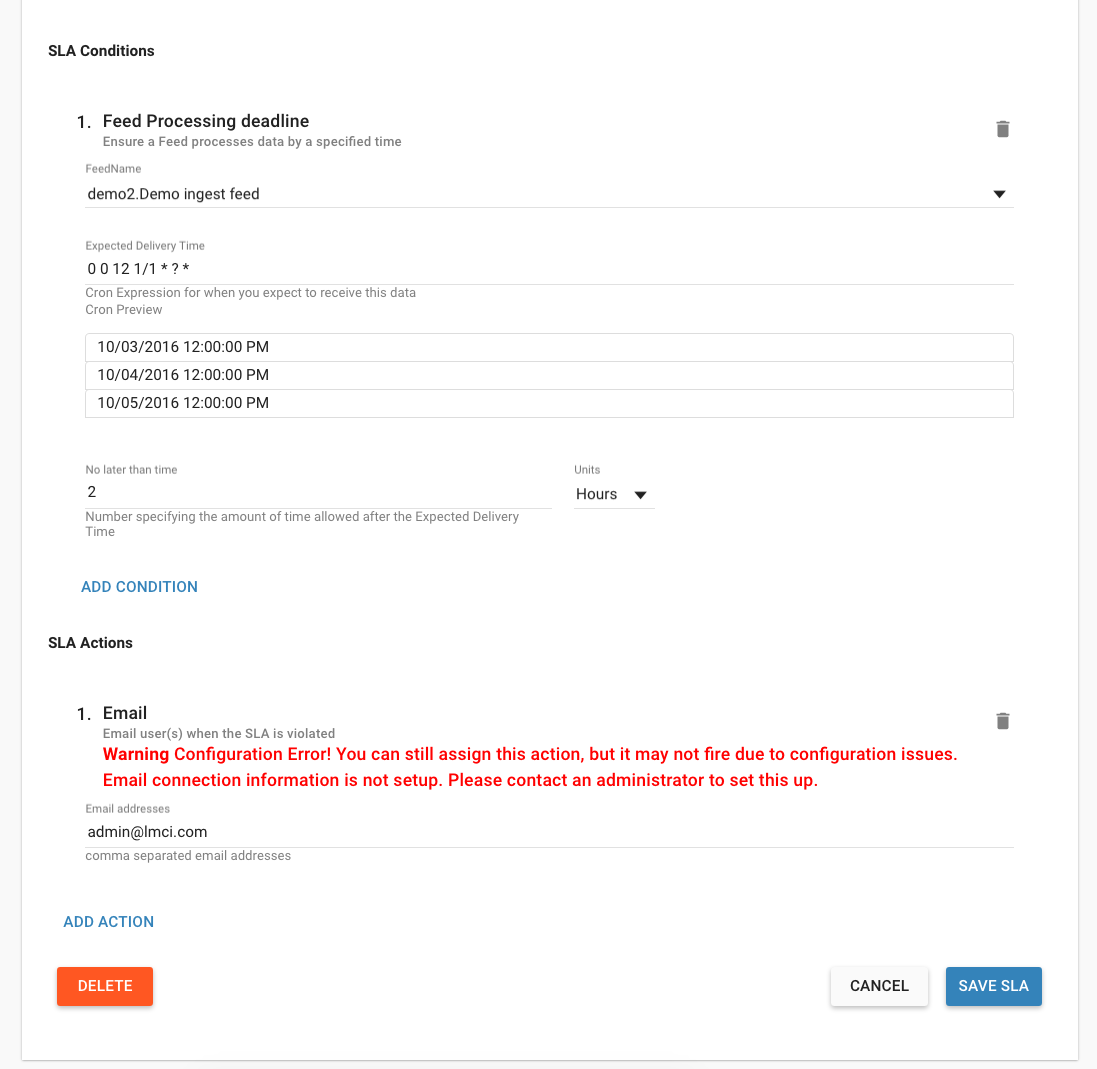
The scheduling of SLAs can be viewed and via the “Scheduler” tab.
This allows a user to pause the entire Scheduler, pause specific SLAs, and even manually trigger SLAs to execute.
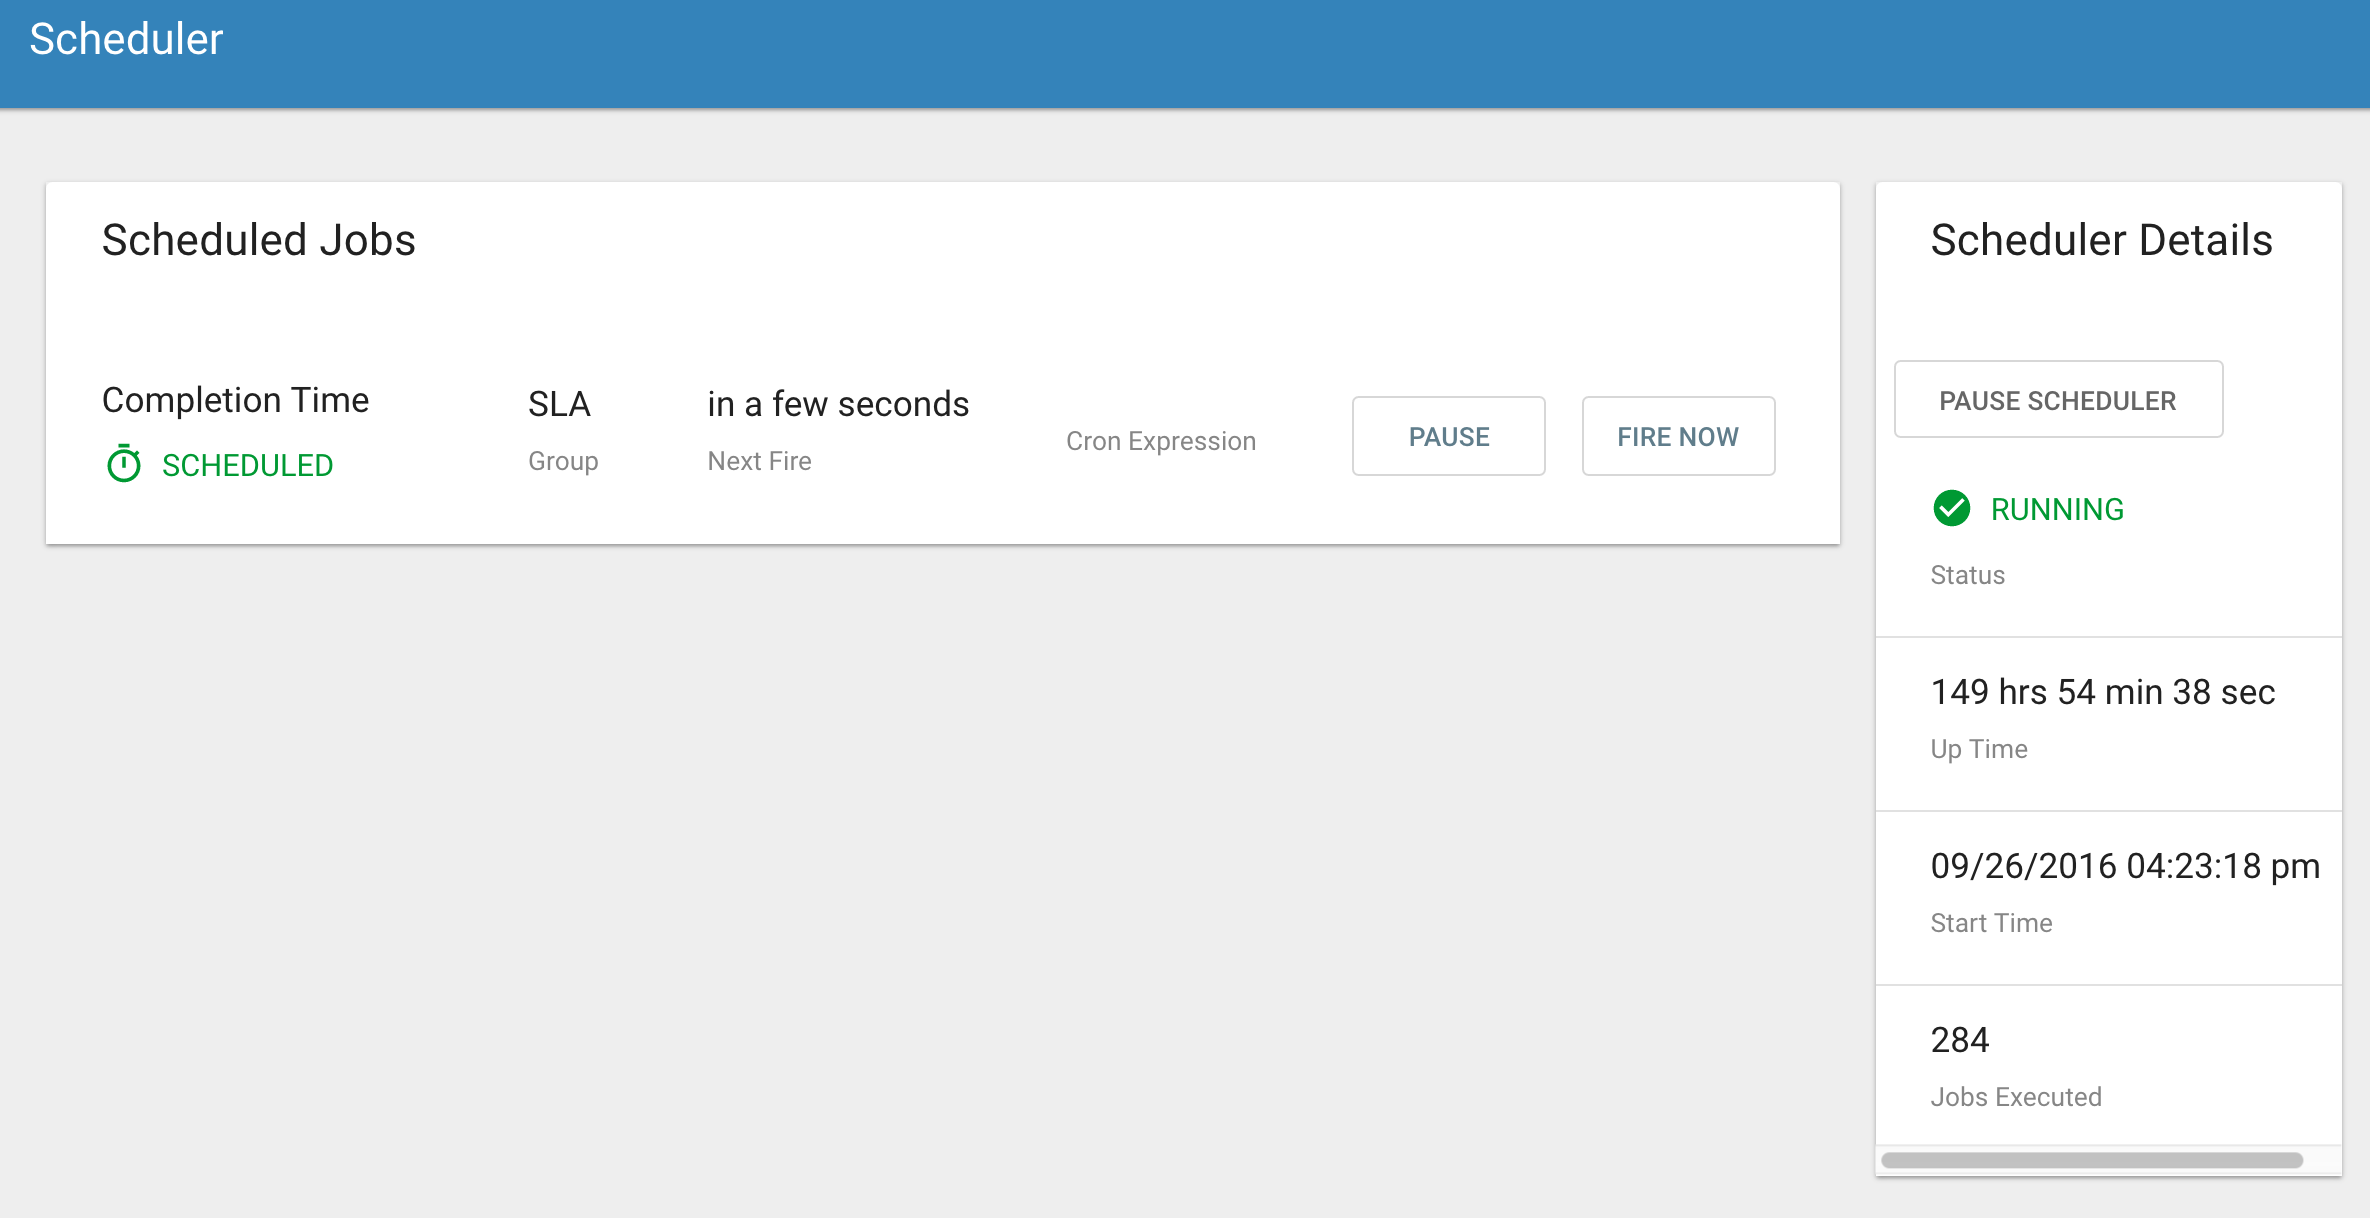
Changing an SLA
To change the schedule of a given SLA :
Click on the SLA tab in the Feed Manager site.

Select the SLA whose schedule you would like to change.

Edit the configurations and click Save SLA.
Filtering Job History
The following section describes how to filter the job and feed history tables. Kylo provides a dynamic filter capability for any table displaying multiple rows of information.
Data Table Operations
Sorting Content
All tables allow for the columns to be sorted. An arrow will appear next to the column indicating the sort direction. Click on the column header to change the sort.
Filtering Tables
All Tables in Kylo have a Filter bar above them. The rows can be filtered using the search bar at the top.
Clicking on the  icon in the top right of the table will
display the table so that you can sort by column.
icon in the top right of the table will
display the table so that you can sort by column.

Click on any of the column headers, or click on the  icon in
the top right of the table, to sort.
icon in
the top right of the table, to sort.
Charts and Pivot Tables
The Charts tab allows you to query and perform data analysis on the Jobs in the system. The right panel allows you to provide filter input that will drive the bottom Pivot Chart panel.
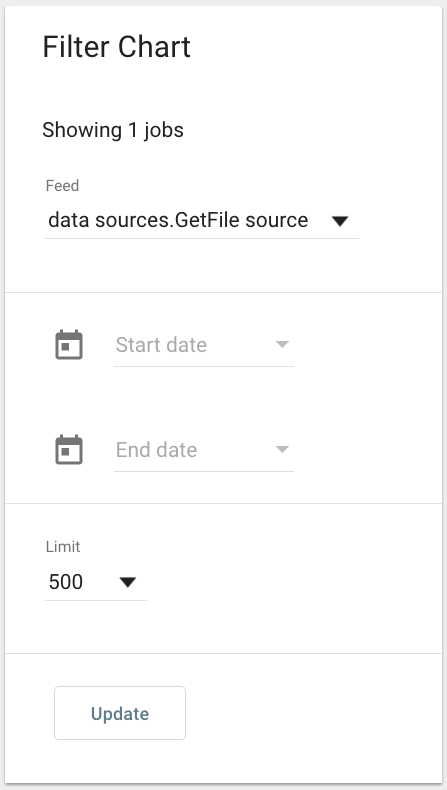
The Pivot Charts panel is a rich drag and drop section that allows you to create custom tables and charts by dragging attributes around. The drop down at the top left allows you to choose how you want to display the data

The data attributes at the top can be dragged into either Column Header or Row level attributes for the rendered pivot.
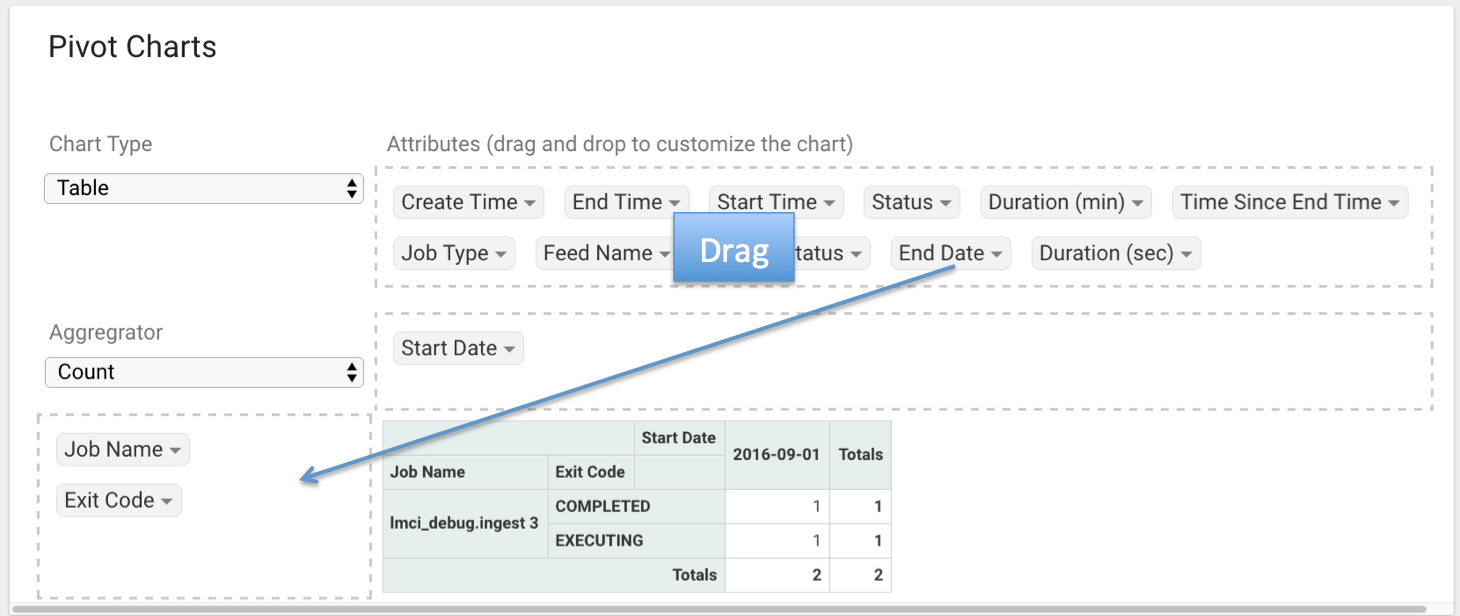
Clicking the down arrow on each attribute allows you to filter out certain fields.
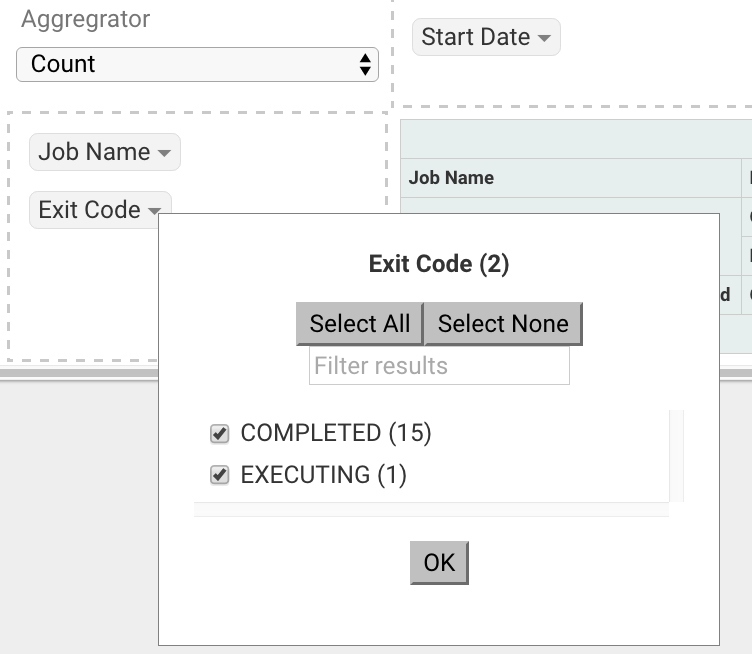
This interface allows you to filter the job data and create many different combinations of tables and charts.
Software Components
The following provides a basic overview of the components and dependencies for Kylo:
- Web-based UI (tested with Safari, Firefox, Chrome)
- Embedded Tomcat web container (configurable HTTP port)
- Java 8
- Stores job history and metadata in Postgres or MySQL
- NiFi 1.x+
- ActiveMQ
- Elasticsearch (optional, but required for full feature set)
Installation
Please refer to the installation guide for Kylo installation procedures.
Application Configuration
Configuration files for Kylo are located at:
/opt/kylo/kylo-services/conf/application.properties
/opt/kylo/kylo-ui/conf/application.properties
Application Properties
The application.properties file in kylo-services specifies most of the standard configuration in pipeline.
Note
Any change to the application properties will require an application restart.
Below is a sample properties file with Spring Datasource properties for spring batch and the default data source:
Note
Cloudera default password for root access to mysql is “cloudera”.
spring.datasource.url=jdbc:mysql://localhost:3306/kylo
spring.datasource.username=root
spring.datasource.password=
spring.datasource.maxActive=10
spring.datasource.validationQuery=SELECT 1
spring.datasource.testOnBorrow=true
spring.datasource.driverClassName=com.mysql.jdbc.Driver
spring.jpa.database-platform=org.hibernate.dialect.MySQL5InnoDBDialect
spring.jpa.open-in-view=true
#
#Postgres datasource configuration
#
#spring.datasource.url=jdbc:postgresql://localhost:5432/pipeline_db
#spring.datasource.driverClassName=org.postgresql.Driver
#spring.datasource.username=root
#spring.datasource.password=thinkbig
#spring.jpa.database-platform=org.hibernate.dialect.PostgreSQLDialect
###
# Current available authentication/authorization profiles:
# * auth-simple - Uses authenticationService.username and authenticationService.password for authentication (development only)
# * auth-file - Uses users.properties and roles.properties for authentication and role assignment
#
spring.profiles.active=auth-simple
authenticationService.username=dladmin
authenticationService.password=thinkbig
###Ambari Services Check
ambariRestClientConfig.username=admin
ambariRestClientConfig.password=admin
ambariRestClientConfig.serverUrl=http://127.0.0.1:8080/api/v1
ambari.services.status=HDFS,HIVE,MAPREDUCE2,SQOOP
###Cloudera Services Check
#clouderaRestClientConfig.username=cloudera
#clouderaRestClientConfig.password=cloudera
#clouderaRestClientConfig.serverUrl=127.0.0.1
#cloudera.services.status=
##HDFS/[DATANODE,NAMENODE,SECONDARYNAMENODE],HIVE/[HIVEMETASTORE,HIVESERVER2],YARN,SQOOP
# Server port
#
server.port=8420
#
# General configuration - Note: Supported configurations include STANDALONE, BUFFER_NODE_ONLY, BUFFER_NODE, EDGE_NODE
#
application.mode=STANDALONE
#
# Turn on debug mode to display more verbose error messages in the UI
#
application.debug=true
#
# Prevents execution of jobs at startup. Change to true, and the name of the job that should be run at startup if we want that behavior.
#
spring.batch.job.enabled=false
spring.batch.job.names=
#spring.jpa.show-sql=true
#spring.jpa.hibernate.ddl-auto=validate
# NOTE: For Cloudera metadata.datasource.password=cloudera is required
metadata.datasource.driverClassName=com.mysql.jdbc.Driver
metadata.datasource.url=jdbc:mysql://localhost:3306/kylo
metadata.datasource.username=root
metadata.datasource.password=
metadata.datasource.validationQuery=SELECT 1
metadata.datasource.testOnBorrow=true

# NOTE: For Cloudera hive.datasource.username=hive is required.

hive.datasource.driverClassName=org.apache.hive.jdbc.HiveDriver
hive.datasource.url=jdbc:hive2://localhost:10000/default
hive.datasource.username=
hive.datasource.password=
# NOTE: For Cloudera hive.metastore.datasource.password=cloudera is required.
##Also Clouder url should be /metastore instead of /hive
hive.metastore.datasource.driverClassName=com.mysql.jdbc.Driver
hive.metastore.datasource.url=jdbc:mysql://localhost:3306/hive
#hive.metastore.datasource.url=jdbc:mysql://localhost:3306/metastore
hive.metastore.datasource.username=root
hive.metastore.datasource.password=
hive.metastore.validationQuery=SELECT 1
hive.metastore.testOnBorrow=true
nifi.rest.host=localhost
nifi.rest.port=8079
elasticsearch.host=localhost
elasticsearch.port=9300
elasticsearch.clustername=demo-cluster
## used to map Nifi Controller Service connections to the User Interface
## naming convention for the property is nifi.service.NIFI_CONTROLLER_SERVICE_NAME.NIFI_PROPERTY_NAME
##anything prefixed with nifi.service will be used by the UI. Replace Spaces with underscores and make it lowercase.
nifi.service.mysql.password=
nifi.service.example_mysql_connection_pool.password=
jms.activemq.broker.url:tcp://localhost:61616
jms.client.id=thinkbig.feedmgr
## nifi Property override with static defaults
##Static property override supports 2 usecases
# 1) store properties in the file starting with the prefix defined in the "PropertyExpressionResolver class" default = config.
# 2) store properties in the file starting with "nifi.<PROCESSORTYPE>.<PROPERTY_KEY> where PROCESSORTYPE and PROPERTY_KEY are all lowercase and the spaces are substituted with underscore
##Below are Ambari configuration options for Hive Metastore and Spark location
config.hive.schema=hive
nifi.executesparkjob.sparkhome=/usr/hdp/current/spark-client
##cloudera config
#config.hive.schema=metastore
#nifi.executesparkjob.sparkhome=/usr/lib/spark
## how often should SLAs be checked
sla.cron.default=0 0/5 * 1/1 * ? *
Kylo Metadata
Kylo stores its metadata in the database configured in /opt/kylo/kylo-services/conf/application.properties in the following lines:
metadata.datasource.driverClassName=com.mysql.jdbc.Driver
metadata.datasource.url=jdbc:mysql://localhost:3306/kylo
metadata.datasource.username=root
metadata.datasource.password=
The metadata database needs to be configured in order to have Kylo metadata backed up and recovered.
For example, MySQL backup can be configured using the methods provided at http://dev.mysql.com/doc/refman/5.7/en/backup-methods.html.
NiFi Data
Data and metadata in NiFi is intended to be transient, and depends on the state of the flows in NiFi. However, NiFi can be configured to keep metadata and data in certain directories, and those directories can be backed up as seen fit. For example, in the nifi.properties file, changing
nifi.flow.configuration.file=/opt/nifi/data/conf/flow.xml.gz
will have NiFi store its flows in /opt/nifi/data/conf/flow.xml.gz.
With a default Kylo installation, NiFi is configured to put all of its flows, templates, data in the content repository, data in the flowfile repository, and data in the provenance repository in /opt/nifi/data. For more information about these configurations, the NiFi system administrator’s guide is the authority.
Startup and Shutdown
Kylo service automatically starts on system boot.
- Manual startup and shutdown from command-line:
$ sudo /etc/init.d/kylo-services start
$ sudo /etc/init.d/kylo-ui start
$ sudo /etc/init.d/kylo-spark-shell start

$ sudo /etc/init.d/kylo-services stop
$ sudo /etc/init.d/kylo-ui stop
$ sudo /etc/init.d/kylo-spark-shell stop
Log Files
Kylo uses Log4J as its logging provider.
- Default location of application log file is:
/var/log/kylo-<ui, services, or spark-shell>/
- Log files roll nightly with pipeline-application.log.<YYYY-MM-DD>
- Log levels, file rotation, and location can be configured via:
/opt/kylo/kylo-<ui, services, or
spark-shell>/conf/log4j.properties
Additional Configuration
The following section contains additional configuration that is possible.
Configuring JVM Memory
You can adjust the memory setting of the Kylo Service using the KYLO_SERVICES_OPTS environment variable. This may be necessary if the application is experiencing OutOfMemory errors. These would appear in the log files.
export KYLO_SERVICES_OPTS="-Xmx2g"
The setting above would set the Java maximum heap size to 2 GB.
Service Status Configuration
The Dashboard page displays Service Status as a Key Performance Indicator. The list of services is configurable using the following instructions:
Viewing Service Details
Within Kylo on the Dashboard tab the “Services” indicator box shows the services it is currently monitoring. You can get details of this by clicking on the Services tab:
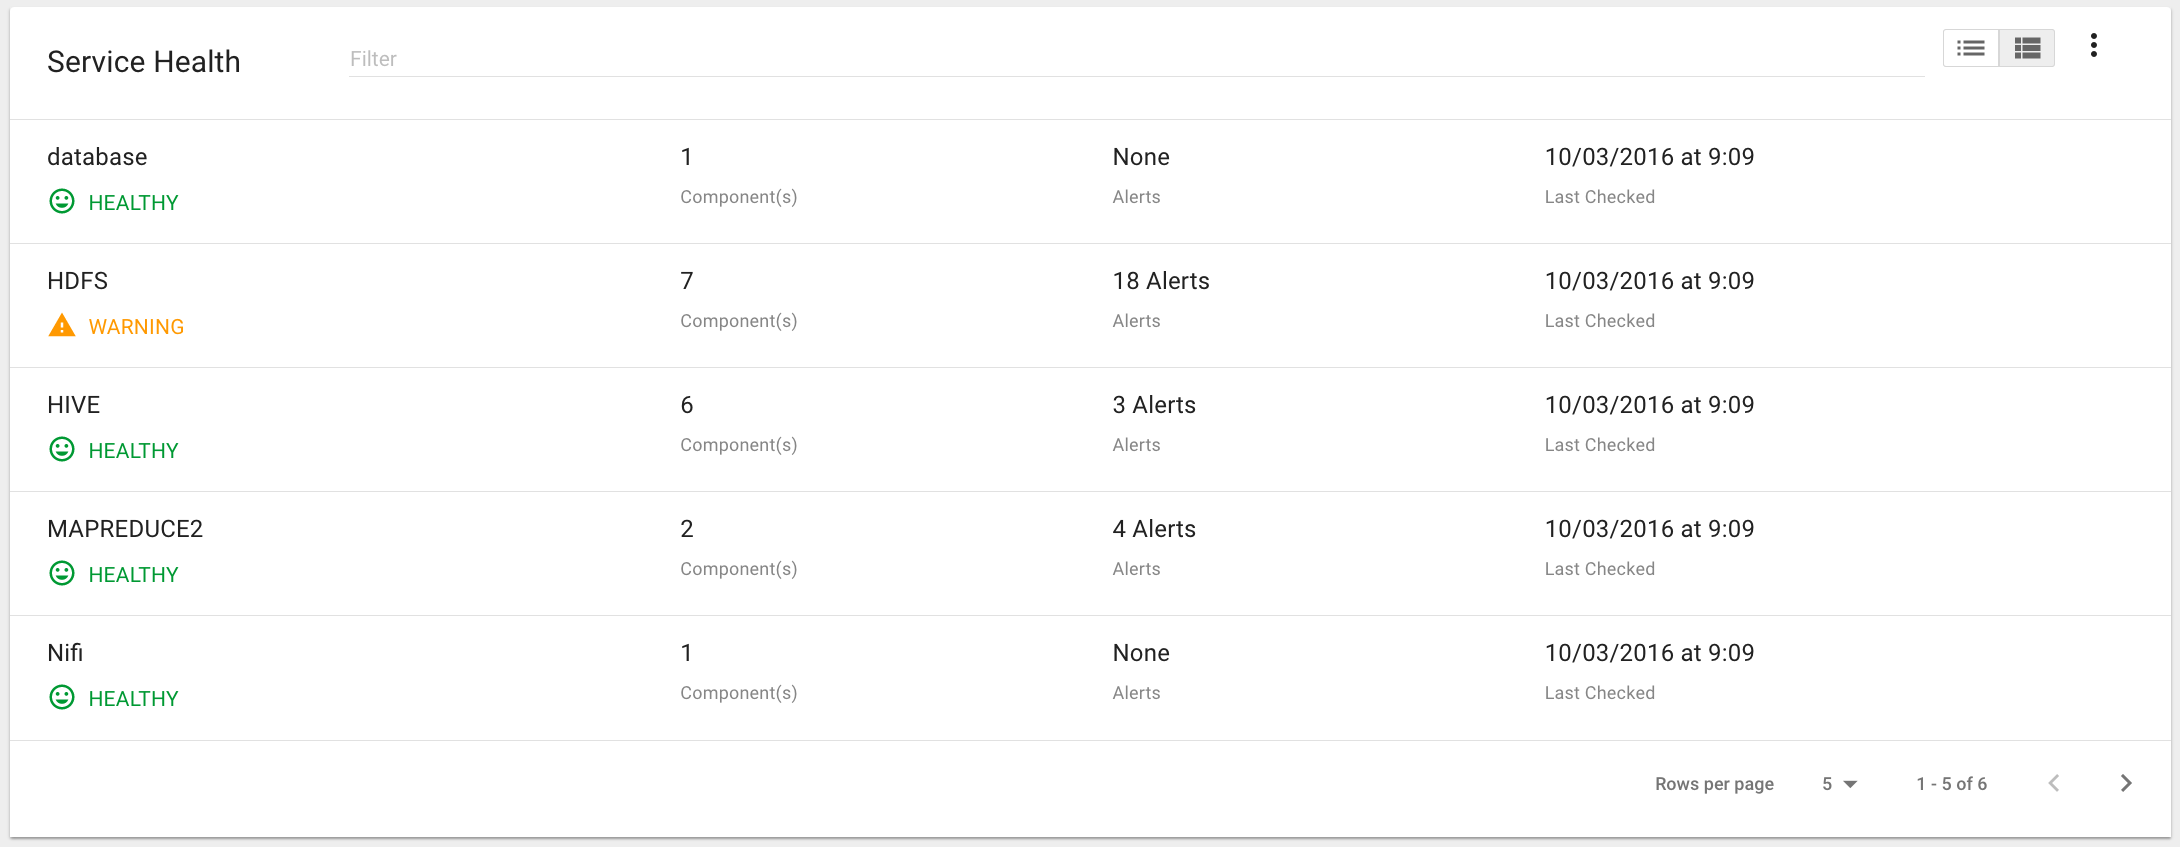

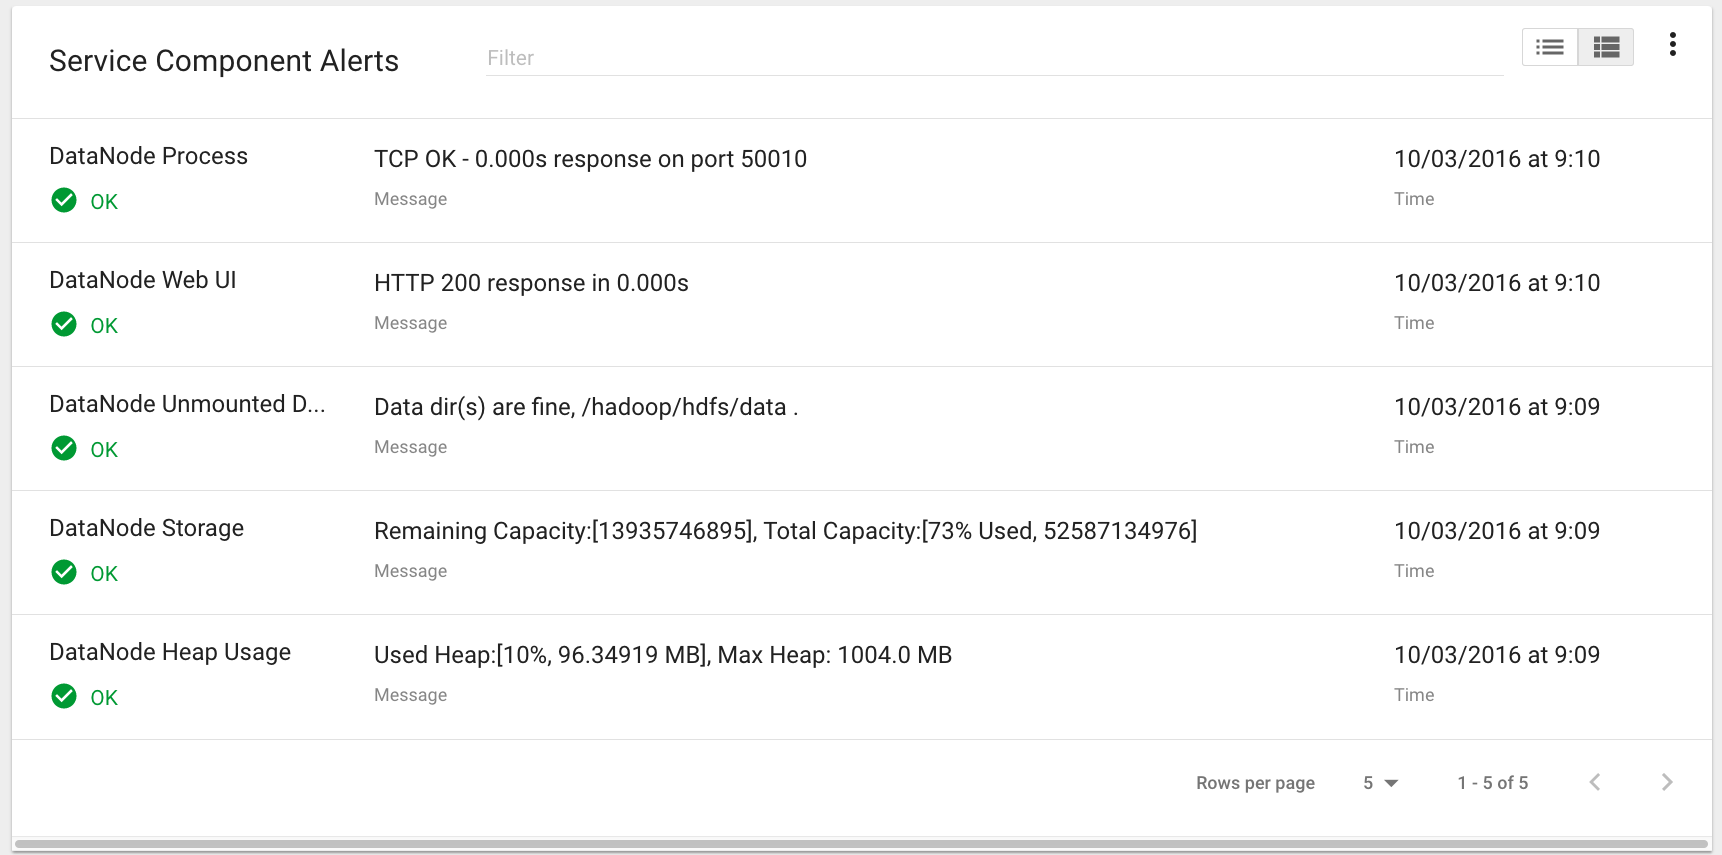
The Services Indicator automatically refreshes every 15 seconds to provide live updates on service status.
Example Service Configuration
The below is the service configuration monitoring 4 services:
ambari.services.status=HDFS,HIVE,MAPREDUCE2,SQOOP
Migrating Templates and Feeds
Exporting Registered Templates
In Kylo, a template can be exported from one instance of Kylo to another. To export a template, navigate to the Feed Manager site by clicking Feed Manager on the left pane.
Then navigate to the Templates tab. All of the templates that have been
registered in this instance of Kylo will be listed here. 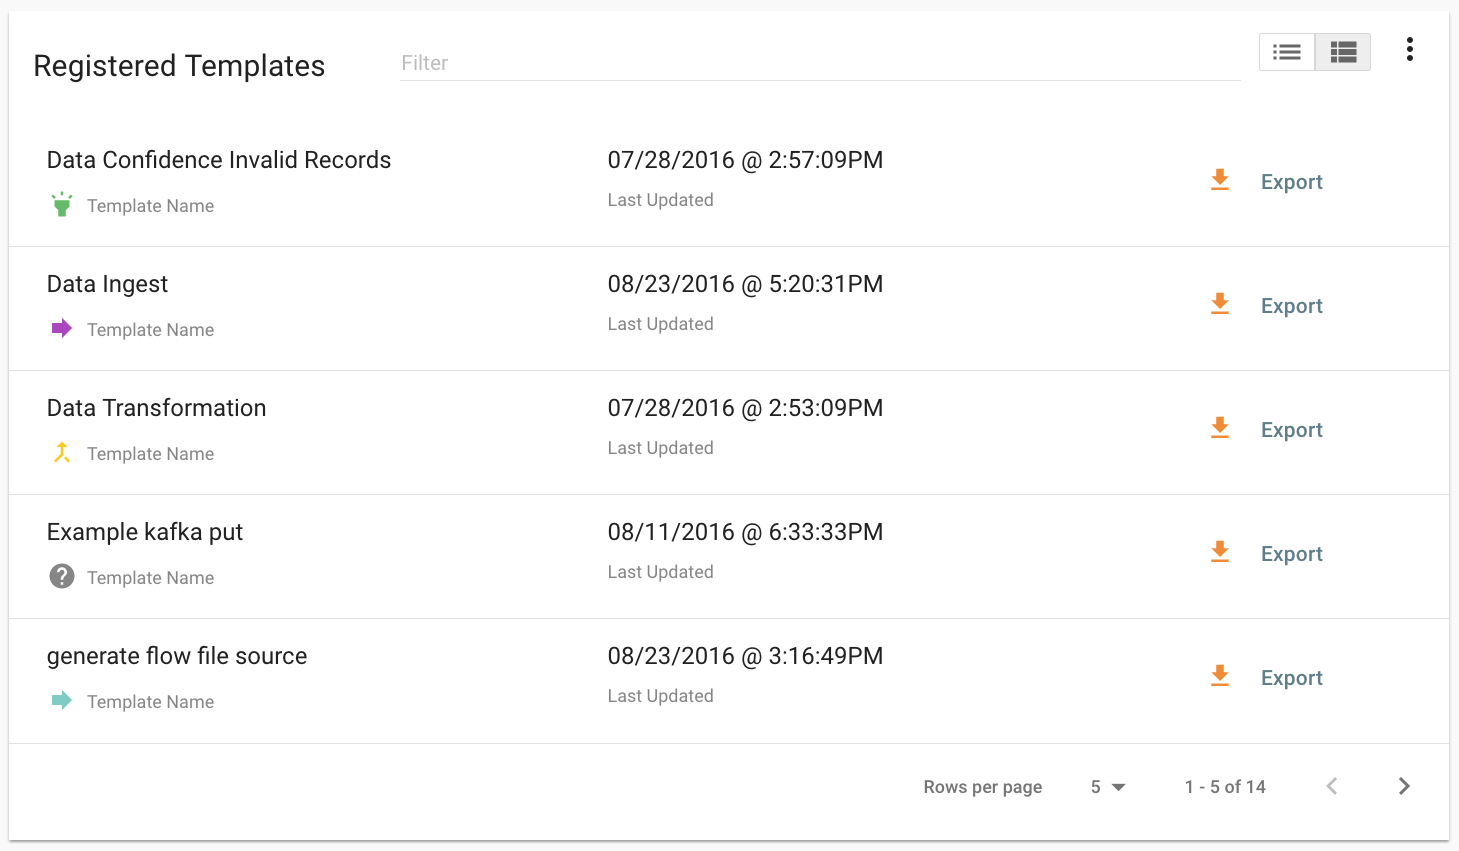
To export a template, click the Export button for that template. This will download a zip archive of the template.
Importing Registered Templates
To import a registered template, on the Templates tab click on the
 button in the top right. Select Import from File.

Browse for the zip archive of the registered template, select whether or not to overwrite any existing registered templates with the same name, and click upload.
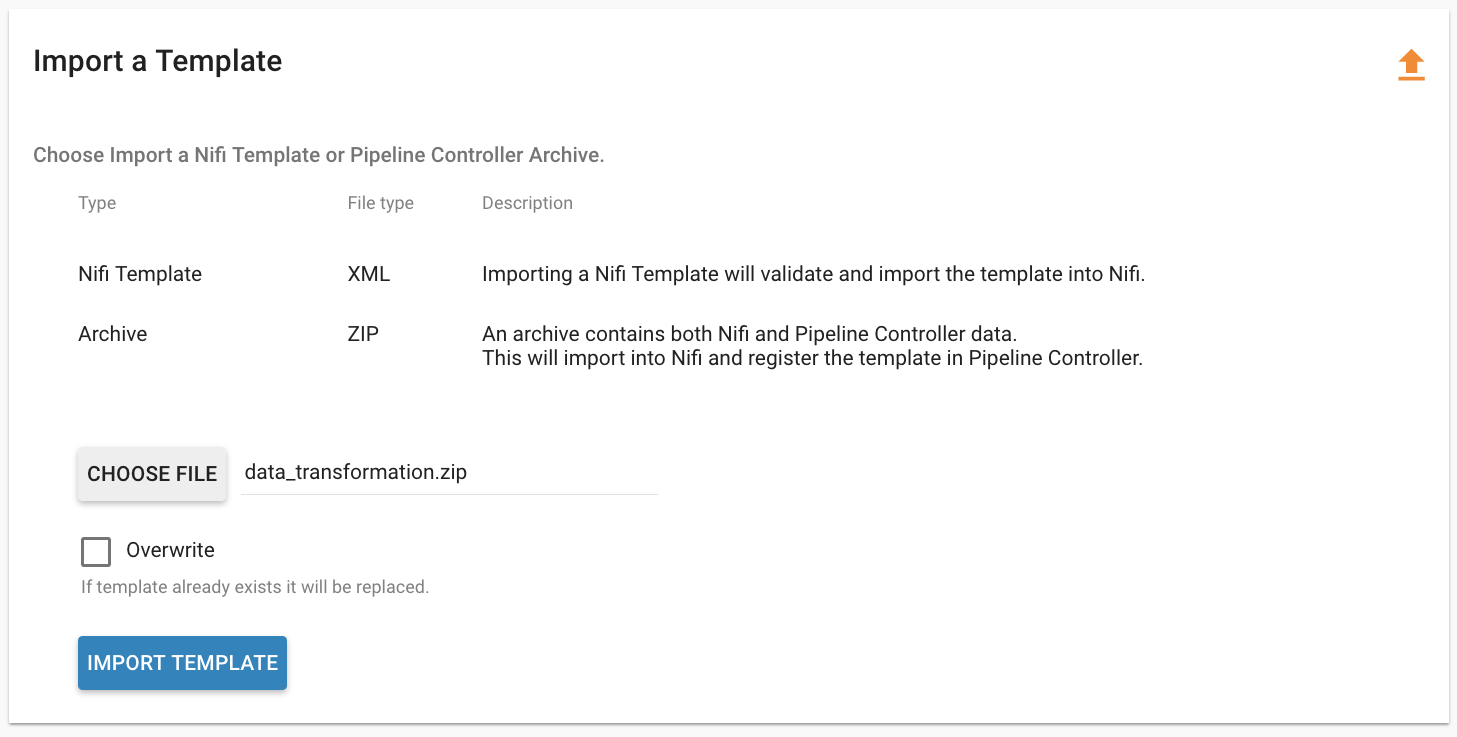
The template is now in the list of registered templates, and a feed can be created from it. This will also import the associated NiFi template into NiFi.
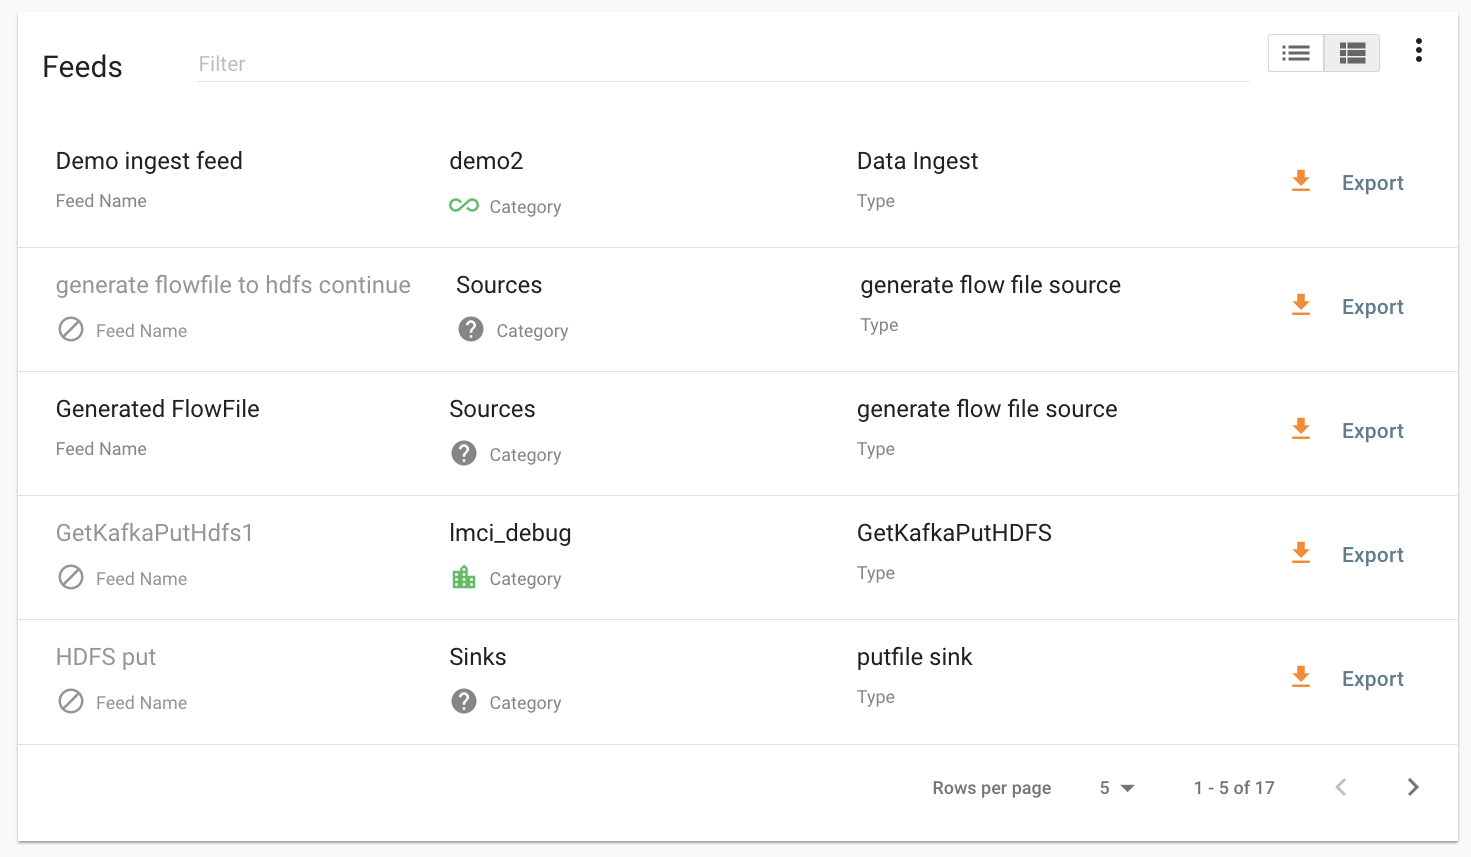
Exporting Feeds
To export a feed for deployment in another instance of Kylo, click on the Feeds tab. Similarly to the templates page, there will be a list, this time with feeds instead of templates. Click the export button to export a feed as a zip archive.
Importing Feeds
To import a feed, click the button in the top right of the
Feeds page. Click “Import” text at the top of the screen.
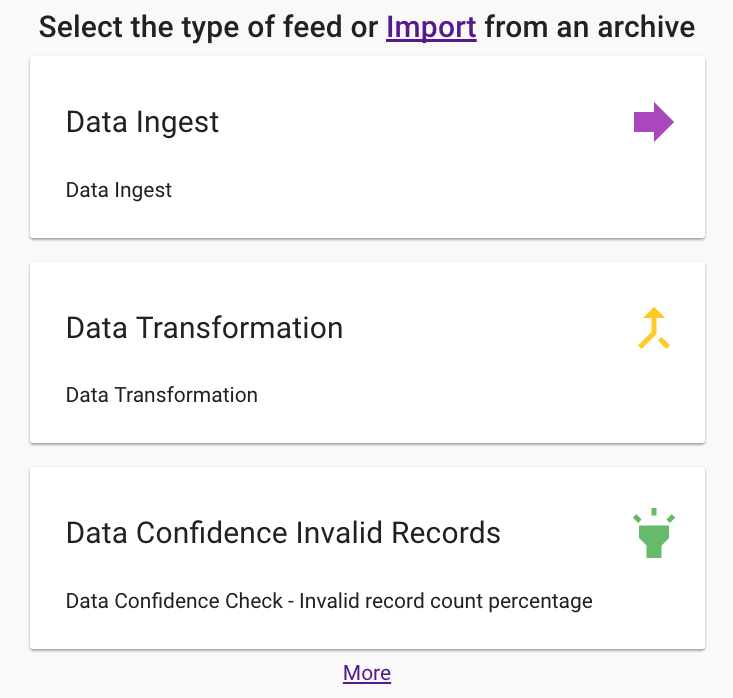
Browse for the exported feed and then click Import Feed.
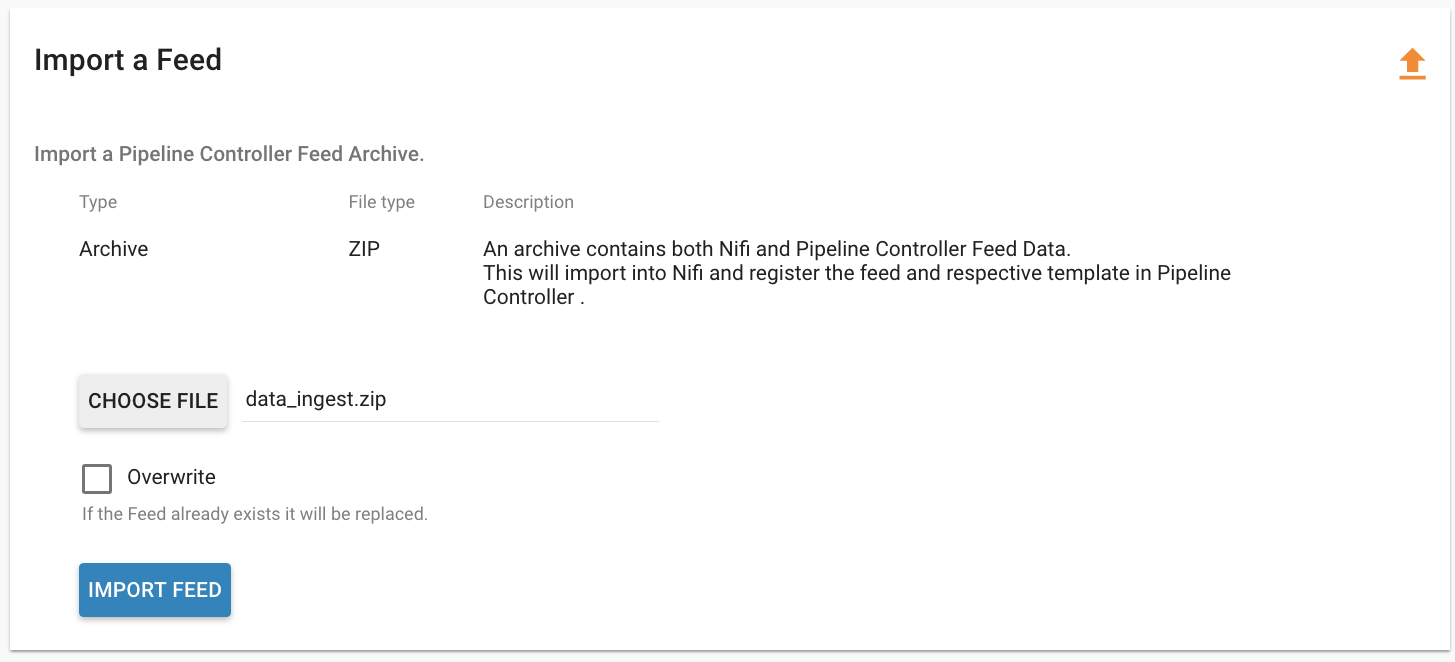
If the import is successful, you should now see a running feed in the Feeds tab.
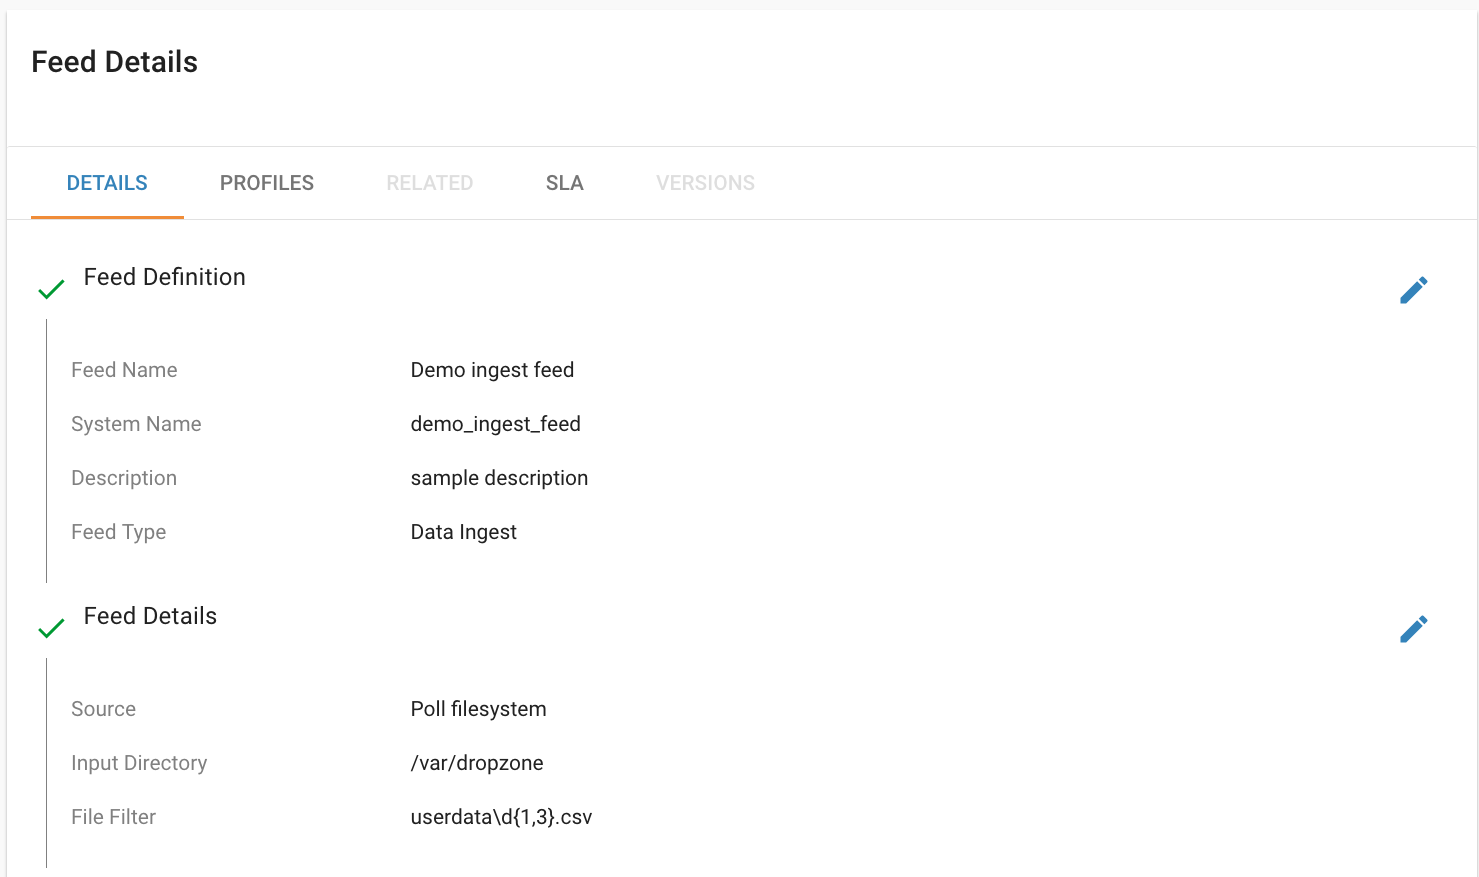
Altering Feed Configurations
A feed that has been imported may have configurations specific to an environment, depending on its registered template. To change configurations on a feed, click on the Feeds tab in the Feed Manager site and then click on the name of the feed you want to update. A list of configurations will be present.
Click on the  icon to allow editing the fields. When done
editing the fields for a section, click Save.
icon to allow editing the fields. When done
editing the fields for a section, click Save.

Kylo recreates the flow in NiFi with the new values. Keep in mind that the values that are configurable here are determined by the registered template, so registered templates need to expose environment-specific properties if they are to be configured or updated at a feed level.
Updating Sensitive Properties in NiFi
Some NiFi processors and controller services have properties that are deemed sensitive, and are therefore not saved when exporting from Kylo. Because of this, some Kylo templates and feeds are not directly portable from one instance of Kylo to another, without some changes in NiFi. In these situations, sensitive values need to be entered directly into NiFi running on the target environment, and then the changes must be saved in a new NiFi template and used to overwrite the imported NiFi template. If the sensitive properties are only within controller services for the imported artifact, then the controller service must be disabled, the sensitive value entered, and the controller service re-enabled, but a new NiFi template does not need to be made.
It is uncommon for NiFi processors to have sensitive properties, and is most often seen in controller services, such as a DBCPConnectionPool for connection to a database. If the controller services used by a template or feed are already in existence in NiFi in the target environment, then Kylo uses those controller services. This issue only exists when importing a template or feed that has NiFi processors with sensitive properties or that use controller services that do not exist in the target environment.
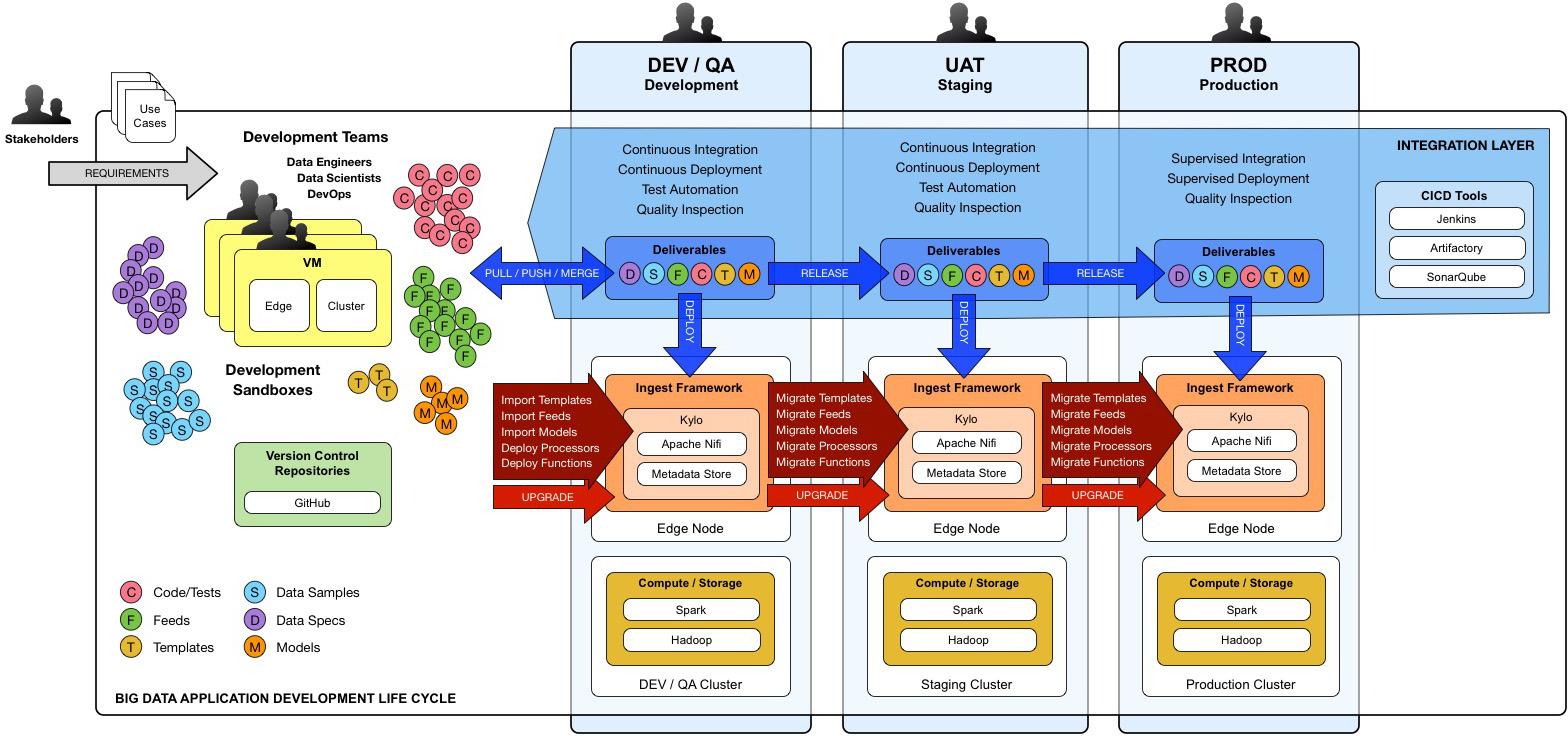
Continuous Integration / Continuous Deployment (CICD)
Kylo currently does not have built-in or integrated CICD. However, Kylo allows you to export both templates (along with any registered properties) and feeds that can then be imported to any environment.
The following approach for CICD should be incorporated:
Build a flow in Nifi and get it configured and working in a dev instance of Nifi and Kylo as a Feed.
Once its ready to be tested export that Feed from Kylo. This export is a zip containing the feed metadata along with the categories and templates used to create the feed.
Have a separate VM running Kylo and NiFi. This would be where the scripts would create, run, and test the feeds and flows.
Have a separate Script/Maven project running to instantiate this feed and run it. This could look something like the following: Have a Maven module running that has a TestCase that looks for these exported feed zip files and then uses NiFi and Kylos Rest apis to create them, run the feed, verify the results, and then tear down the flow.
Kylo operates over REST and has many rest endpoints that can be called to achieve the same results as you see in the Kylo UI. For example importing a feed can be done by posting the zip file to the endpoint:
/v1/feedmgr/admin/import-feed
Once the tests all are passed you could take that exported Feed/Template, save it in a version control system (i.e. git), and import it into a different environment.
The graphic below depicts an example of an overall CICD ecosystem that could be implemented with Kylo with an approach similar to what Think Big R&D has put forward.
Migrating Kylo and NiFi Extensions
If custom NiFi or Kylo plugins/extensions have been built, they must copied to all instances of NiFi and Kylo where you wish to use them. Custom NiFi extensions are packaged in .nar format, and must be place in NiFi’s lib directory. With a default Kylo installation, this directory is /opt/nifi/current/lib. Place all custom .nar files there, and restart the NiFi service.
Custom Kylo plugins belong in the /opt/kylo/kylo-services/plugin directory in a default Kylo installation. Place the .jar files for custom plugins in this directory and manually start and stop the kylo-services service.
Operational Considerations
When considering promoting Kylo/NiFi metatdata you will need to restart Kylo:
- Upon changing/adding any new NiFi processors/services (changing code that creates a new Nifi plugin .nar file) you will need to bounce NiFi
- Upon changing/adding any new Kylo plugin/extension (changing the java jar) you will need to bounce Kylo (kylo-services)