Release 0.8.2 (July 12, 2017)
Highlights
- 109 issues resolved
- NiFi 1.3.0 support
- Global search enhancements. Auto-indexing of feed, category, tags, and improved UI.
- Ability to use Solr vs ElasticSearch (ES default)
- Streaming visualization improvements. New Ops UI for monitoring streaming feeds.
- Provenance event performance tune-up. Fixed lag that could occur for high throughput streaming feeds.
- Pluggable UI. Ability to add dynamic new user interface components. See: Plugin APIs
- Wrangler support for Spark yarn-cluster mode
- Wrangler supports user impersonation. There are a few different run modes depending on which configuration properties are specified.
- TAR file installation support. This allows installation in different folder locations and to be ran as different linux users/groups
- Example S3 data ingest template. Ability to process data without bringing the data into the edge node. See: S3 Standard Ingest Template
- SPNEGO bug fixes and improvements with Active Directory integration
Download Links
- RPM : http://bit.ly/2uT8bTo
- Debian : http://bit.ly/2uSTvUv
- TAR : http://bit.ly/2ug8ZUz
Upgrade Instructions from v0.8.1
Build or download the RPM
- Uninstall Kylo:
/opt/kylo/remove-kylo.sh
- Install the new RPM:
rpm –ivh <RPM_FILE>
Update NiFi to use the new KyloPersistentProvenanceRepository. Kylo no longer uses the NiFi reporting task to capture provenance events. Instead it uses a modified ProvenanceRepository.
3.1. In NiFi stop and delete the Kylo Reporting Task and its associated Controller Service.
3.2. Stop NiFi
3.3. Follow the guide NiFi & Kylo Provenance to setup the KyloPersistentProvenanceRepository
Copy the application.properties file from the 0.8.1 install. If you have customized the application.properties file you will want to copy the 0.8.1 version and add the new properties that were added for this release.
4.1 Find the /bkup-config/TIMESTAMP/kylo-services/application.properties file
- Kylo will backup the application.properties file to the following location, /opt/kylo/bkup-config/YYYY_MM_DD_HH_MM_millis/kylo-services/application.properties, replacing the “YYYY_MM_DD_HH_MM_millis” with a valid time:
4.2 Copy the backup file over to the /opt/kylo/kylo-services/conf folder
### move the application.properties shipped with the .rpm to a backup file
mv /opt/kylo/kylo-services/application.properties application.properties.0_8_2_template
### copy the backup properties  (Replace the YYYY_MM_DD_HH_MM_millis  with the valid timestamp)
cp /opt/kylo/bkup-config/YYYY_MM_DD_HH_MM_millis/kylo-services/application.properties /opt/kylo/kylo-services/conf
4.3 Add in the new properties to the /opt/kylo/kylo-services/application.properties file
ActiveMQ properties: Redelivery processing properties are now available for configuration. If Kylo receives provenance events and they have errors are are unable to attach NiFi feed information (i.e. if NiFi goes down and Kylo doesnt have the feed information in its cache) then the JMS message will be returned for redelivery based upon the following parameters. Refer to the ActiveMQ documentation, http://activemq.apache.org/redelivery-policy.html, for assigning these values:
## retry for xx times before sending to DLQ (Dead Letter Queue) set -1 for unlimited redeliveries
jms.maximumRedeliveries=100
##The initial redelivery delay in milliseconds.
jms.initialRedeliveryDelay=1000
##retry every xx seconds
jms.redeliveryDelay=5000
##Sets the maximum delivery delay that will be applied if the useExponentialBackOff option is set (use value -1 for no max)
jms.maximumRedeliveryDelay=600000
##The back-off multiplier.
jms.backOffMultiplier=5
##Should exponential back-off be used, i.e., to exponentially increase the timeout.
jms.useExponentialBackOff=false
- NiFi 1.3 support
If you are using NiFi 1.2 or 1.3 you need to update the spring profile to point to the correct nifi version.
Example NiFi 1.2 or 1.3 support
### Indicate the NiFi version you are using with the correct spring profile.
###  - For NiFi 1.0.x or 1.1.x:    nifi-v1
###  - For NiFi 1.2.x or 1.3.x:    nifi-v1.2
spring.profiles.include=native,nifi-v1.2,auth-kylo,auth-file
Example NiFi 1.0 or 1.1 support
spring.profiles.include=native,nifi-v1,auth-kylo,auth-file
- Global search support
Elasticsearch is the default search provider. Add
search-esto spring profiles:spring.profiles.include=<all your existing profiles>,search-es
4.4 Ensure the property
security.jwt.keyin both kylo-services and kylo-ui application.properties file match. They property below needs to match in both of these files:- /opt/kylo/kylo-ui/conf/application.properties
- /opt/kylo/kylo-services/conf/application.properties.
security.jwt.key=
Backup the Kylo database. Run the following code against your kylo database to export the ‘kylo’ schema to a file. Replace the PASSWORD with the correct login to your kylo database.
mysqldump -u root -pPASSWORD --databases kylo >kylo-0_8_1_backup.sql
- Database updates. Kylo uses liquibase to perform database updates. Two modes are supported.
Automatic updates
By default Kylo is set up to automatically upgrade its database on Kylo services startup. As such, there isn’t anything specific an end user has to do. When Kylo services startup the kylo database will be automatically upgraded to latest version if required. This is configured via an application.properties setting
liquibase.enabled=trueManual updates
Sometimes, however you may choose to disable liquibase and manually apply the upgrade scripts. By disabling liquibase you are in control of how the scripts are applied. This is needed if the kylo database user doesnt have priviledges to make schema changes to the kylo database. Please follow this Database Upgrades on how to manually apply the additional database updates.
Update the NiFi nars. Run the following shell script to copy over the new NiFi nars/jars to get new changes to NiFi processors and services.
/opt/kylo/setup/nifi/update-nars-jars.sh <NIFI_HOME> <KYLO_SETUP_FOLDER> <NIFI_LINUX_USER> <NIFI_LINUX_GROUP>

Example:  /opt/kylo/setup/nifi/update-nars-jars.sh /opt/nifi /opt/kylo/setup nifi users
Update configuration for using Elasticsearch as the search engine
Provide cluster properties
- Update cluster properties in
/opt/kylo/kylo-services/conf/elasticsearch.propertiesif different from the defaults provided below.
search.host=localhost
search.clusterName=demo-cluster
search.restPort=9200
search.transportPort=9300
Kylo services must be restarted if the above file has been changed to pick up the new values.
service kylo-services restart
- Update cluster properties in
Steps to import updated Index Schema Service feed
- Feed Manager -> Feeds -> + orange button -> Import from file -> Choose file
- Pick the
index_schema_service_elasticsearch.feed.zipfile available at/opt/kylo/setup/data/feeds/nifi-1.0 - Leave Change the Category field blank (It defaults to System)
- Click Yes for these two options (1) Overwrite Feed (2) Replace Feed Template
- (optional) Click Yes for option (3) Disable Feed upon import only if you wish to keep the indexing feed disabled upon import (You can explicitly enable it later if required)
- Click Import Feed.
- Verify that the feed imports successfully.
- If your Hive metastore is in a schema named something other than
hive, edit the feed and sethive.schemato the schema name. This configuration value may be available with the keyconfig.hive.schemain/opt/kylo/kylo-services/conf/application.properties
Steps to import updated Index Text Service feed
- Feed Manager -> Feeds -> + orange button -> Import from file -> Choose file
- Pick the
index_text_service_elasticsearch.feed.zipfile available at/opt/kylo/setup/data/feeds/nifi-1.0 - Leave Change the Category field blank (It defaults to System)
- Click Yes for these two options (1) Overwrite Feed (2) Replace Feed Template
- (optional) Click Yes for option (3) Disable Feed upon import only if you wish to keep the indexing feed disabled upon import (You can explicitly enable it later if required)
- Click Import Feed.
- Verify that the feed imports successfully.
Re-import the templates.
- Re-import Data Ingest template (data_ingest.zip)
- Re-import Data Transformation template (data_transformation.zip)
- Re-import Data Confidence template (data_confidence_invalid_records.zip)
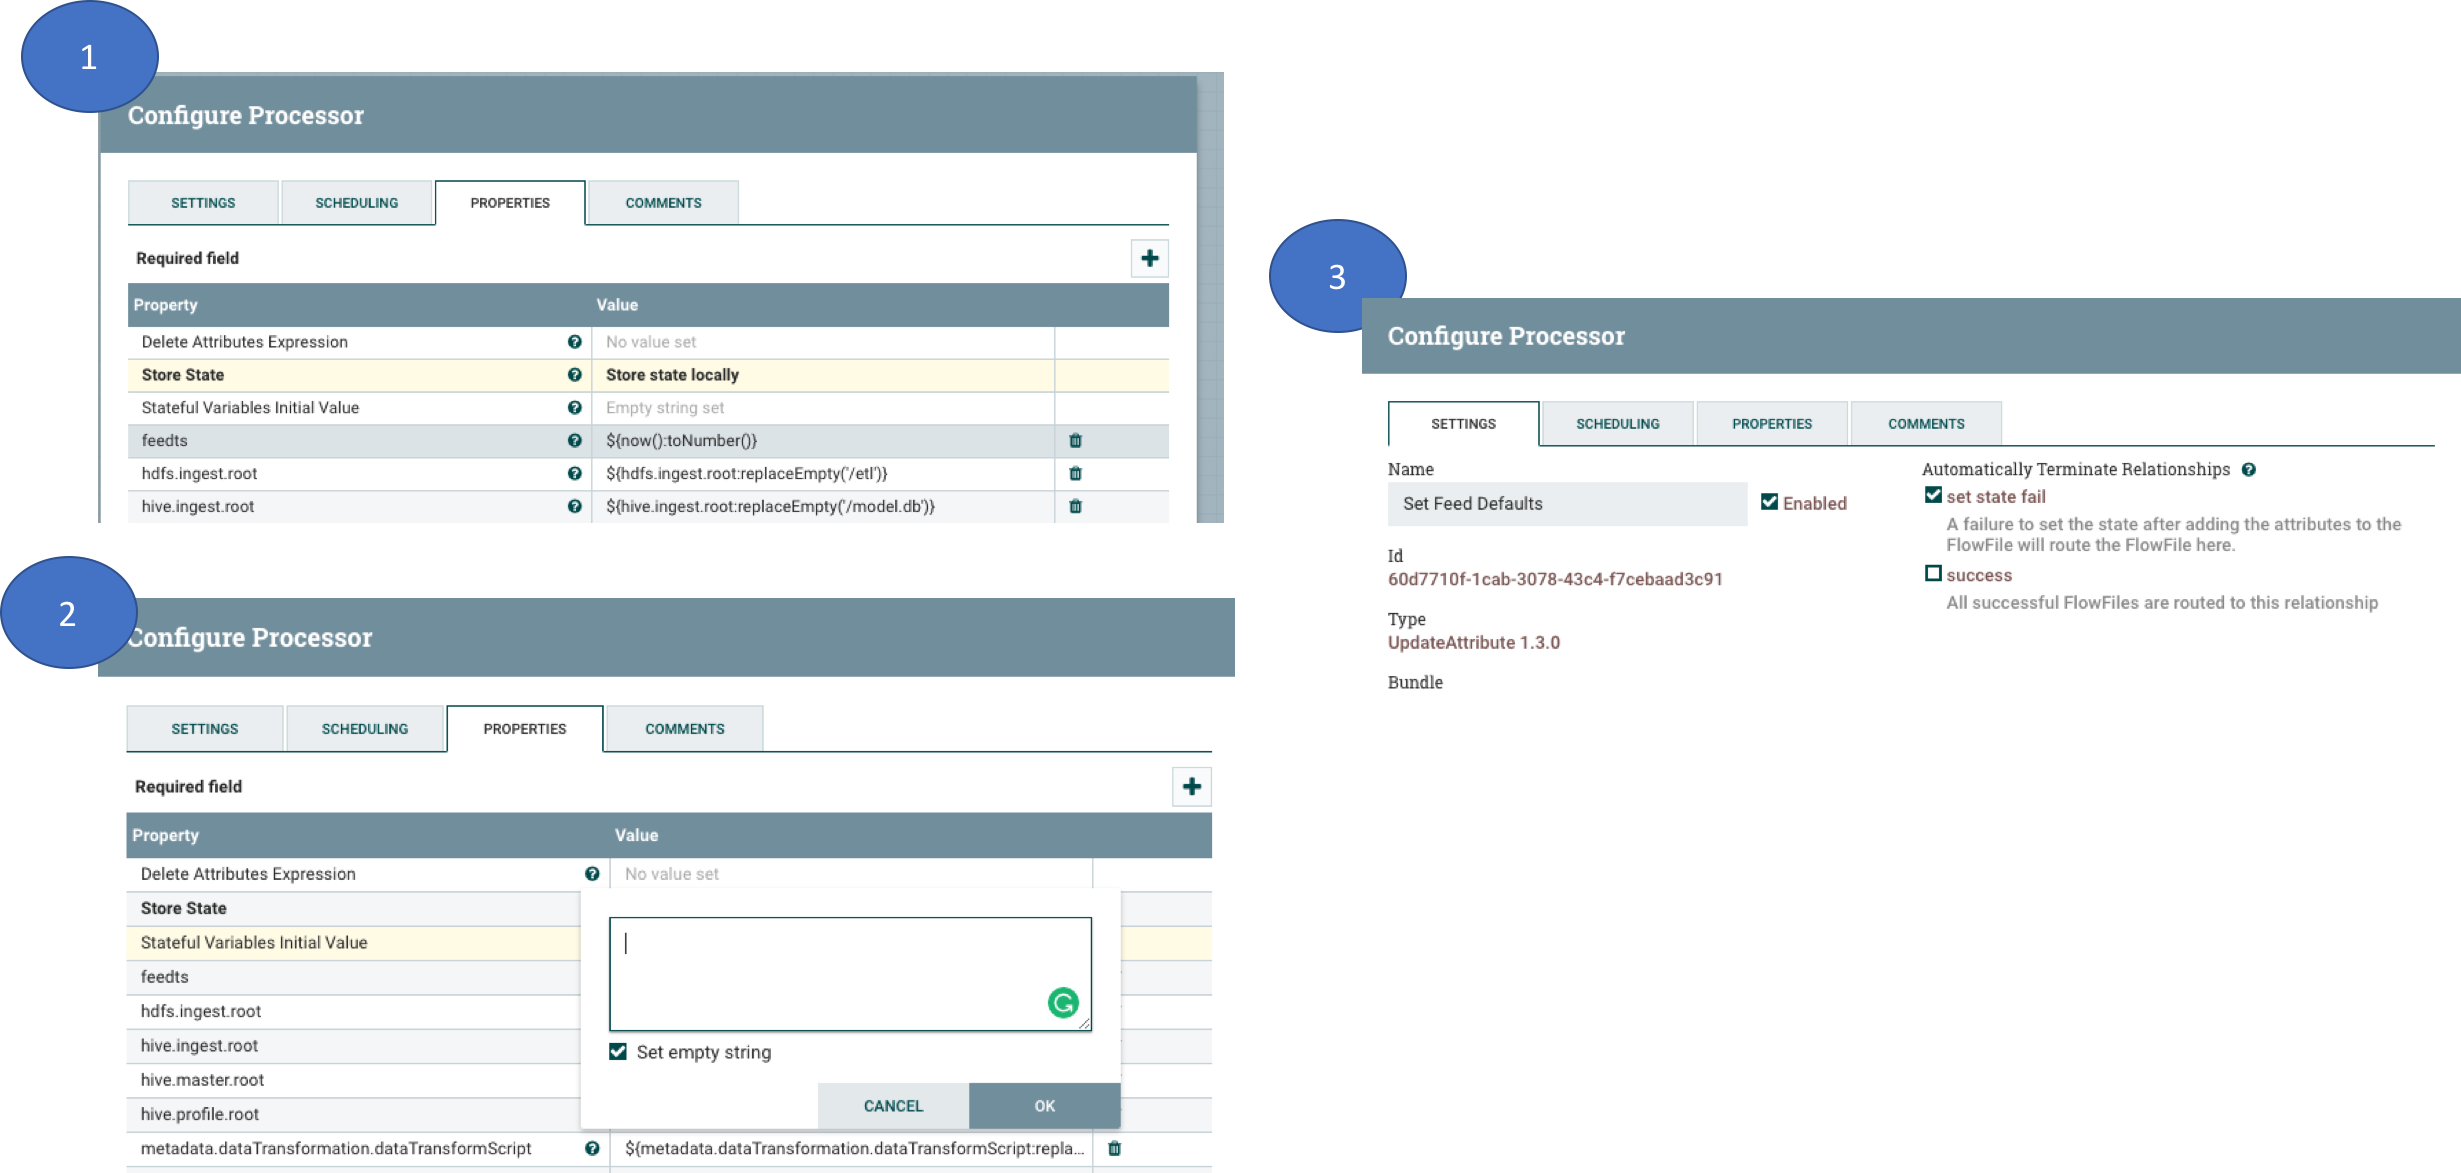
NiFi 1.2/1.3 breaking change.
NiFi introduced a change to their UpdateAttributes processor that prevents empty strings from being set to the dynamic properties unless the state is saved.
The templates (in step 7 above) already have this change made. Any feeds you have from a previous NiFi version that have empty strings in the UpdateAttributes processors will be broken and need fixed. You can fix them by importing the new templates and then saving the feed, or you will neeed to manually fix the feed/template. If you need to manually fix feed flows in NiFi do the following:
- Modify the UpdateAttributes processors and change the “Store State” property to be “Store state locally”
- Change the “Stateful Variables Initial Value” and check the box “Set empty string”
- Go to the Settings for the processor and Auto terminate the “set state fail” route.